﻿# 如何在現有 ASP.NET Core 網站加入 Azure AD 的 OpenId Connect 登入

我們公司採用 Microsoft 365 辦公協作環境，這也意味著背後一定使用了 Azure AD 目錄服務，因此我們可以直接拿 Azure AD 作為公司的 OAuth 2.0 + OpenId Connect (OIDC) 認證與授權平台，因此開發公司內部應用程式就變的非常容易。這篇文章我將說明要將一個 ASP.NET Core 網站加入 Azure AD 的身份驗證流程，以及使用時的注意事項。

### 建立全新 ASP.NET Core MVC 專案並設定 Azure AD 登入整合 (OpenId Connect)

1.  先註冊應用程式
    
    > [https://portal.azure.com/#blade/Microsoft\_AAD\_IAM/ActiveDirectoryMenuBlade/RegisteredApps](https://portal.azure.com/#blade/Microsoft_AAD_IAM/ActiveDirectoryMenuBlade/RegisteredApps)
    
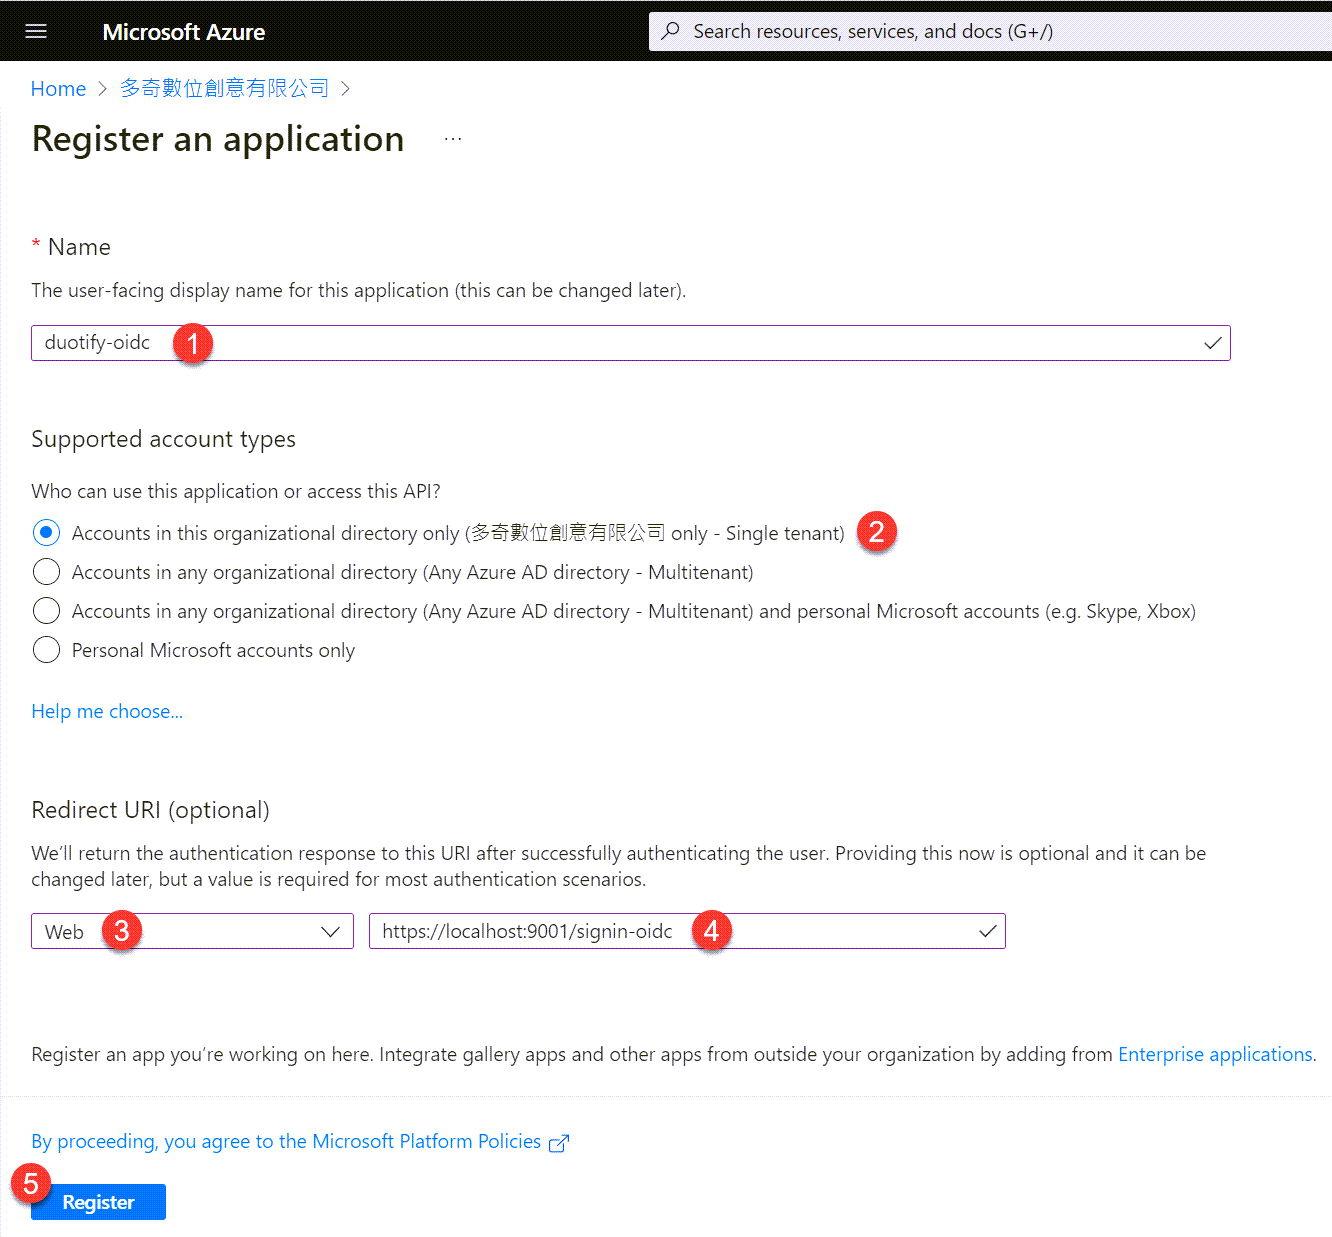
    依照下圖進行設定，尤其是 Redirect URI 千萬別忘了，網址要先設定為 `https://localhost:9001/signin-oidc`：
    
    ![Azure AD - Register an application](https://stwillblogassets.blob.core.windows.net/files/images/external/user-images.githubusercontent.com/5b236f2e2900161197e9-162602671-80327c6c-0a82-4ac2-b9dd-f3d94bec558a.png)
    
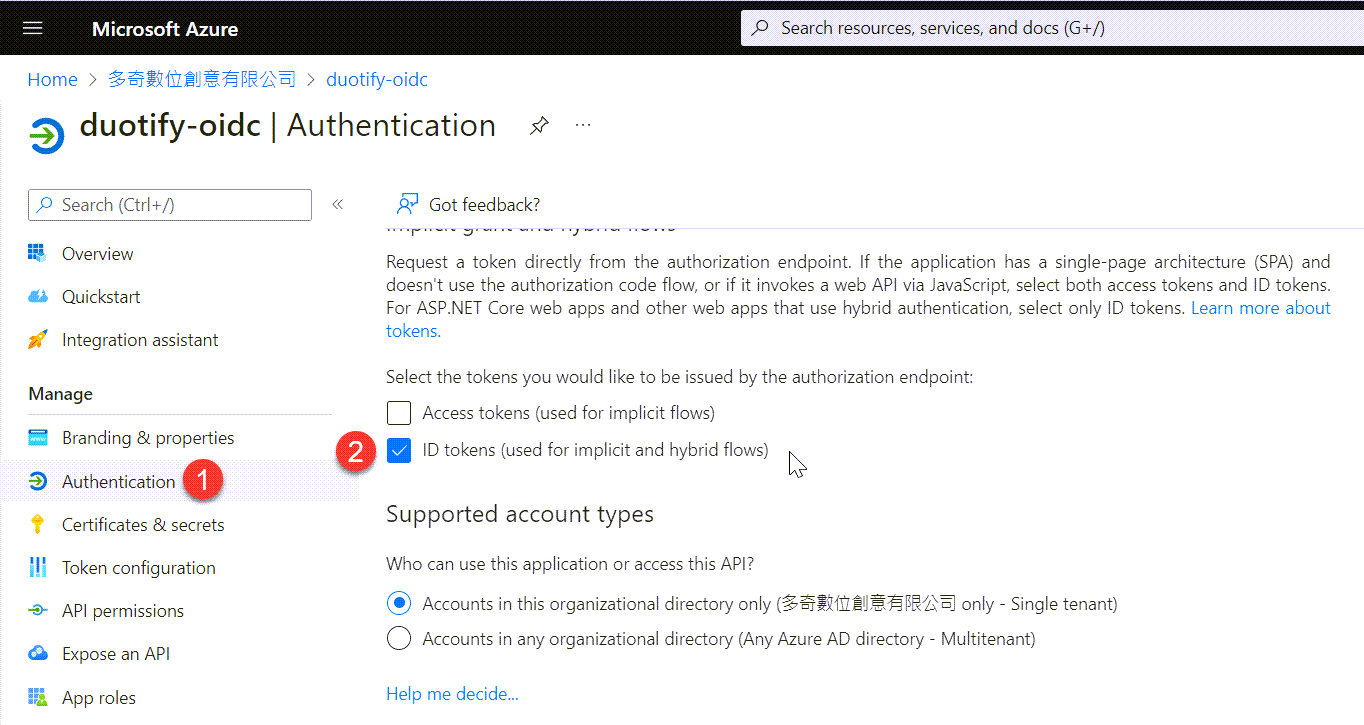
    建立好之後，記得要到 **Authentication** 頁籤勾選 `ID tokens` 核取項目， 這樣才能在 Implicit Flow 取得使用者身份，這也才能完成 OpenId Connect 的認證流程！
    
    ![Azure AD - Authentication](https://stwillblogassets.blob.core.windows.net/files/images/external/user-images.githubusercontent.com/2778fb9db804a2de0a7e-162602704-d4f970cd-e395-43ff-a994-16eb28666d3f.png)
    
    建立完成後，請記得從 Azure AD 取得 `Application (client) ID`, `Directory (tenant) ID` 與 `Primary domain` 這三個重要參數！
    
2.  建立 ASP.NET Core MVC 專案
    
    依據步驟 1 取得的三項資訊，拿來建立全新的 MVC 應用程式：
    
    ```bash
    dotnet new mvc -n AzureADLoginDemo --auth SingleOrg --tenant-id 76275315-xxxx-xxxx-xxxx-a329d6222150 --domain xxxxxx.onmicrosoft.com --client-id 7332902c-xxxx-xxxx-xxxx-63a0dcbf3d80
    ```
    
    建立好專案骨架後，先調整專案下的 `Properties\launchSettings.json` 檔案，將 `.profiles.AzureADLoginDemo.applicationUrl` 的內容修改為 `https://localhost:9001` 即可！
    
3.  大功告成！
    
    真的不誇張，就是上面這樣，兩個步驟就可以完成一個 ASP.NET Core 網站整合 Azure AD 的 OpenId Connect 登入！👍
    
    接著啟動 ASP.NET Core 網站：
    
    ```bash
    dotnet run
    ```
    
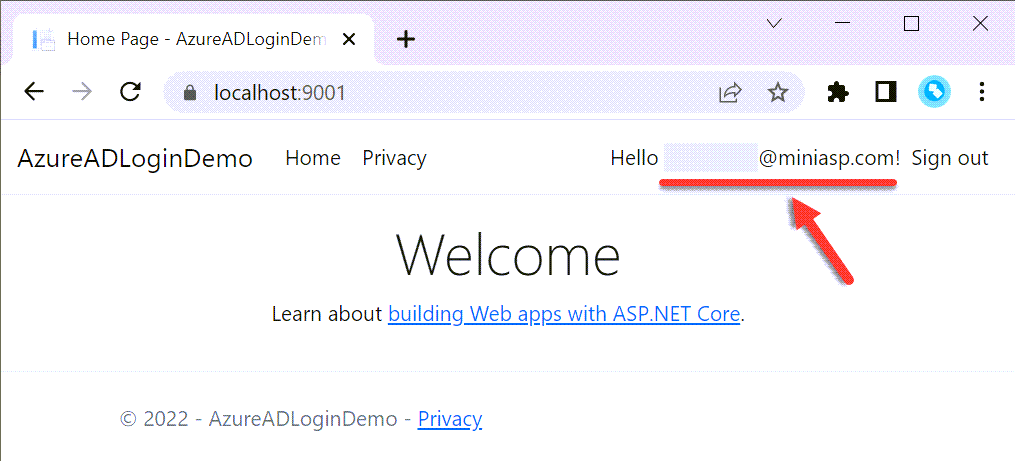
    開啟 [https://localhost:9001](https://localhost:9001) 就會自動轉向到 Azure AD 進行登入，登入成功後就可以看到首頁顯示出畫面了！
    
    ![image](https://stwillblogassets.blob.core.windows.net/files/images/external/user-images.githubusercontent.com/a9d6d300df6d0fab1467-162603015-5ad19fa2-45b4-4713-9a3f-5e10b186376f.png)
    

### 如何將現有網站加入 Azure AD 登入整合 (OpenId Connect)

說實在的，程式碼真的也不多，以下是從無到有的設定步驟：

1.  先註冊應用程式 (設定內容與上一段敘述相同，在此省略說明)
    
2.  建立 ASP.NET Core MVC 專案
    
    ```bash
    dotnet new mvc -n AzureADLoginDemo
    cd AzureADLoginDemo
    code .
    ```
    
    建立好專案骨架後，先調整專案下的 `Properties\launchSettings.json` 檔案，將 `.profiles.AzureADLoginDemo.applicationUrl` 的內容修改為 `https://localhost:9001` 即可！
    
3.  修改 `appsettings.json` 組態設定
    
    ```json
    {
      "AzureAd": {
        "Instance": "https://login.microsoftonline.com/",
        "Domain": "xxxxx.onmicrosoft.com",
        "TenantId": "76275315-xxxx-xxxx-xxxx-a329d6222150",
        "ClientId": "7332902c-xxxx-xxxx-xxxx-63a0dcbf3d80",
        "CallbackPath": "/signin-oidc"
      }
    }
    ```
    
4.  加入以下 NuGet 套件
    
    ```bash
    dotnet add package Microsoft.AspNetCore.Authentication.JwtBearer
    dotnet add package Microsoft.AspNetCore.Authentication.OpenIdConnect
    dotnet add package Microsoft.Identity.Web
    dotnet add package Microsoft.Identity.Web.UI
    ```
    
5.  修改 `Program.cs` 加入 Services 與 Middleware 宣告
    
    加入 Service 宣告
    
    ```csharp
    builder.Services.AddAuthentication(OpenIdConnectDefaults.AuthenticationScheme)
        .AddMicrosoftIdentityWebApp(builder.Configuration.GetSection("AzureAd"));
    
    builder.Services.AddControllersWithViews(options =>
    {
        var policy = new AuthorizationPolicyBuilder()
            .RequireAuthenticatedUser()
            .Build();
        options.Filters.Add(new AuthorizeFilter(policy));
    });
    builder.Services.AddRazorPages()
        .AddMicrosoftIdentityUI();
    ```
    
    加入 Middleware 宣告
    
    ```csharp
    app.UseAuthentication(); // <-- 加入這行
    app.UseAuthorization();
    
    app.MapControllerRoute(
        name: "default",
        pattern: "{controller=Home}/{action=Index}/{id?}")
    .RequireAuthorization(); // <-- 加入這行
    app.MapRazorPages(); // <-- 加入這行
    ```
    
    > 做到這個步驟基本上就已經完成設定了！
    
6.  加入一些 UI 顯示登入狀態
    
    加入一個 `Views/Shared/_LoginPartial.cshtml` 檔案
    
    ```html
    @using System.Security.Principal
    
    <ul class="navbar-nav">
    @if (User.Identity?.IsAuthenticated == true)
    {
            <span class="navbar-text text-dark">Hello @User.Identity?.Name!</span>
            <li class="nav-item">
                <a class="nav-link text-dark" asp-area="MicrosoftIdentity" asp-controller="Account" asp-action="SignOut">Sign out</a>
            </li>
    }
    else
    {
            <li class="nav-item">
                <a class="nav-link text-dark" asp-area="MicrosoftIdentity" asp-controller="Account" asp-action="SignIn">Sign in</a>
            </li>
    }
    </ul>
    ```
    
    到 `Views/Shared/_Layout.cshtml` 加入 Partial View 載入（請加在選單項目的右邊，約第 28 行的位置）
    
    ```html
    <partial name="_LoginPartial" />
    ```
    

### 取得一些額外的使用者資訊 (Claims)

1.  取得預設使用者名稱
    
    `User.Identity.Name` 預設為 Azure AD 的 **User Principal Name**，也就是使用者的 E-mail 地址！
    
    ```csharp
    var email = User.Identity?.Name;
    ```
    
2.  取得 Azure AD 使用者的**顯示名稱**
    
    ```csharp
    var displayName = User.FindFirst("name")?.Value;
    ```
    
3.  取得 Azure AD 使用者的 `ObjectId`
    
    ```csharp
    var objectId = User.FindFirst(Microsoft.Identity.Web.ClaimConstants.ObjectId)?.Value;
    ```
    
4.  取得 Azure AD 組織的 `TenantId`
    
    ```csharp
    var tenantId = User.FindFirst(Microsoft.Identity.Web.ClaimConstants.TenantId)?.Value;
    ```
    
5.  顯示 OpenId Connect 登入過程中取得的 Claims 資訊
    
    這邊我直接修改 `Views\Home\Privacy.cshtml` 頁面，範例程式如下：
    
    ```html
    @using Microsoft.AspNetCore.Authentication
    <h2>Claims</h2>
    <dl>
        @foreach (var claim in User.Claims)
        {
            <dt>@claim.Type</dt>
            <dd>@claim.Value</dd>
        }
    </dl>
    <h2>Properties</h2>
    <dl>
        @{
            var items = (await Context.AuthenticateAsync()).Properties?.Items;
        }
        @if (items != null) foreach (var prop in items)
        {
            <dt>@prop.Key</dt>
            <dd>@prop.Value</dd>
        }
    </dl>
    ```
    

### 取得使用者的 Access Token 並呼叫 Microsoft Graph API

當你取得使用者身份之後，或許你還需要呼叫 Microsoft Graph API 取得更多的使用者資料，這個時候你會需要微調一下專案設定。

1.  啟用 Token 獲取機制 (Token Acquisition)
    
    只要修改 `Program.cs` 註冊 `.AddMicrosoftIdentityWebApp()` 的地方，加入兩行：
    
    ```csharp
    builder.Services.AddAuthentication(OpenIdConnectDefaults.AuthenticationScheme)
        .AddMicrosoftIdentityWebApp(builder.Configuration.GetSection("AzureAd"))
        .EnableTokenAcquisitionToCallDownstreamApi() // <!-- 加上這一行
        .AddInMemoryTokenCaches(); // <!-- 加上這一行
    ```
    
    你可以從 `EnableTokenAcquisitionToCallDownstreamApi()` 這個 API 的命名，大致得知他的真正用途。這句話的的意思就是「啟用 Token 獲取，然後可以呼叫接下來的的 API」，非常直覺的方法命名。另一行 `AddInMemoryTokenCaches()` 則是會將使用者的 Access Token 快取在記憶體中，避免過於頻繁的呼叫 Azure AD 的 Token Endpoint！
    
2.  你必須要從 `appsettings.json` 加入 `ClientSecret` 否則將無法取得 Access Token
    
    ```json
    {
      "AzureAd": {
        "Instance": "https://login.microsoftonline.com/",
        "Domain": "xxxxx.onmicrosoft.com",
        "TenantId": "76275315-xxxx-xxxx-xxxx-a329d6222150",
        "ClientId": "7332902c-xxxx-xxxx-xxxx-63a0dcbf3d80",
        "ClientSecret": "2JY7Q~xxxx~u-xxxxxx-xxxx_mnz2VX4a-", // <-- 加上這一行
        "CallbackPath": "/signin-oidc"
      }
    }
    ```
    
3.  修改 `HomeController` 並注入 `ITokenAcquisition` 服務
    
    ```csharp
    private readonly ITokenAcquisition tokenAcquisition;
    
    public HomeController(ITokenAcquisition tokenAcquisition)
    {
        this.tokenAcquisition = tokenAcquisition;
    }
    ```
    
4.  取得 Access Token 的方法
    
    在 ASP.NET Core MVC 的 Controller 中，你通常會需要套用一個 `[AuthorizeForScopes(Scopes = new[] { "user.read" })]` 屬性 (Attribute)，這是為了避免當執行 `tokenAcquisition.GetAccessTokenForUserAsync(scopes);` 的時候如果發生例外，會將使用者重新導向到 Azure AD 的授權頁面，重新走一次 OAuth 2.0 授權流程，讓使用者同意你可以取得 `user.read` 範圍的資料（就是使用者所有個人資料）。
    
    ```csharp
    [AuthorizeForScopes(Scopes = new[] { "user.read" })]
    public async Task<IActionResult> GetMyProfile()
    {
        string[] scopes = new []{"user.read"};
        string token = await tokenAcquisition.GetAccessTokenForUserAsync(scopes);
    
        ViewBag.token = token;
    
        return View();
    }
    ```
    
5.  呼叫 Microsoft Graph API 取得完整的個人資料
    
    這裡我打算拿 Access Token 呼叫 [https://graph.microsoft.com/v1.0/me](https://graph.microsoft.com/v1.0/me) 這個端點，取得完整的個人資料！
    
    我們先安裝 IdentityServer4 提供的 `IdentityModel` 好用套件：
    
    ```bash
    dotnet add package IdentityModel
    ```
    
    記得先引入 `IdentityModel.Client` 命名空間：
    
    ```csharp
    using IdentityModel.Client;
    ```
    
    接著用以下程式碼就可以很漂亮的取得使用者在 Azure AD 的個人資料了！
    
    ```csharp
    [AuthorizeForScopes(Scopes = new[] { "user.read" })]
    public async Task<IActionResult> GetMyProfile()
    {
        string[] scopes = new []{"user.read"};
        string token = await tokenAcquisition.GetAccessTokenForUserAsync(scopes);
    
        var http = httpClientFactory.CreateClient();
        http.SetBearerToken(token);
        var result = await http.GetStringAsync("https://graph.microsoft.com/v1.0/me");
    
        return Ok(result);
    }
    ```
    
    若要取得使用者在 Azure AD 的照片，可以參考以下程式碼，一樣呼叫 Microsoft Graph API 就可以取得！
    
    ```csharp
    [AuthorizeForScopes(Scopes = new[] { "user.read" })]
    public async Task<IActionResult> GetMyPhoto()
    {
        string[] scopes = new []{"user.read"};
        string token = await tokenAcquisition.GetAccessTokenForUserAsync(scopes);
    
        var http = httpClientFactory.CreateClient();
        http.SetBearerToken(token);
        var result = await http.GetStreamAsync("https://graph.microsoft.com/v1.0/me/photo/$value");
    
        return File(result, "image/jpeg");
    }
    ```
    

### 相關連結

-   範例程式 1: [https://github.com/doggy8088/AzureADLoginDemo](https://github.com/doggy8088/AzureADLoginDemo)
-   範例程式 2: [https://github.com/doggy8088/AzureADLoginWithAccessTokenDemo](https://github.com/doggy8088/AzureADLoginWithAccessTokenDemo)
-   [Microsoft 身分識別平台文件 | Microsoft Docs](https://learn.microsoft.com/zh-tw/azure/active-directory/develop/?WT.mc_id=DT-MVP-4015686)
    -   [Quickstart: Add sign-in with Microsoft to a web app](https://learn.microsoft.com/en-us/azure/active-directory/develop/web-app-quickstart?pivots=devlang-aspnet-core&WT.mc_id=DT-MVP-4015686)
    -   [Quickstart: Protect a web API with the Microsoft identity platform](https://learn.microsoft.com/en-us/azure/active-directory/develop/web-api-quickstart?WT.mc_id=DT-MVP-4015686&pivots=devlang-aspnet)
-   [Microsoft Identity Web · AzureAD/microsoft-identity-web Wiki](https://github.com/AzureAD/microsoft-identity-web/wiki)
    -   [Web Apps · AzureAD/microsoft-identity-web Wiki](https://github.com/AzureAD/microsoft-identity-web/wiki/web-apps)
-   [c# - Setting Authorization Header of HttpClient - Stack Overflow](https://stackoverflow.com/a/57772526/910074)
-   [在 ASP.NET Core 中使用 IHttpClientFactory 發出 HTTP 要求](https://learn.microsoft.com/zh-tw/aspnet/core/fundamentals/http-requests?view=aspnetcore-6.0&WT.mc_id=DT-MVP-4015686)