我們以前在使用 Subversion 的時候就會換掉內建的 TortoiseMerge 改用 WinMerge 做為差異比較的工具,以前也寫過一篇【介紹好用工具:WinMerge】文章介紹過。最近改用 TFS 進行版本控管之後,說實在的還是習慣使用 WinMerge 來做差異比較,也因此研究了一下設定的方法,以下是設定的方法筆記。
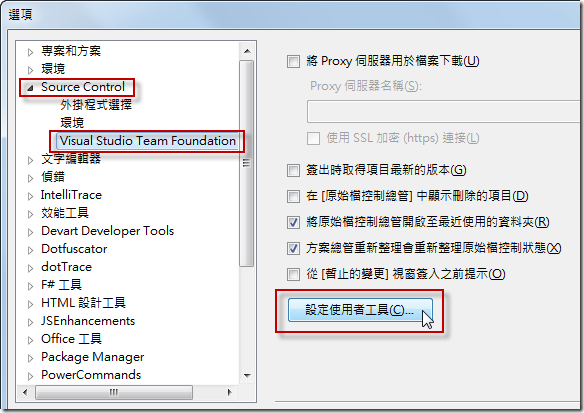
開啟 Visual Studio 2010 的 [工具] / [選項] / [Source Control] / [Visual Studio Team Foundation],並開啟「設定使用者工具」
如下圖按一下「加入」按鈕
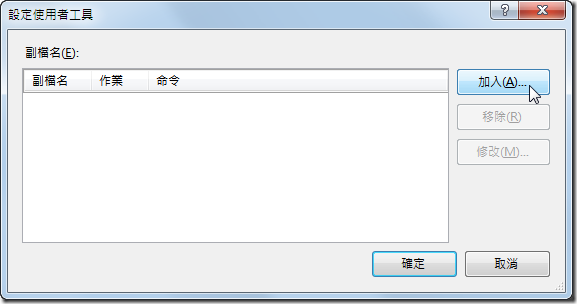
接著我們要設定兩筆資料,一個是設定比較工具,另一個是設定合併工具,我要將這兩個使用的時機都改用 WinMerge 來做修改內容的比較動作。
1. 設定「比較」作業時的工具命令
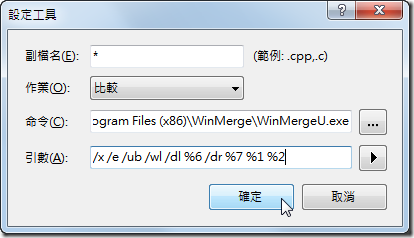
設定資料如下(複製貼上即可)
副檔名:*
作業:比較
命令:C:\Program Files (x86)\WinMerge\WinMergeU.exe
引數:/x /e /ub /wl /dl %6 /dr %7 %1 %2
備註:如果是 x86 架構的作業系統,其命令路徑應該是
C:\Program Files\WinMerge\WinMergeU.exe
2. 設定「合併」作業時的工具命令
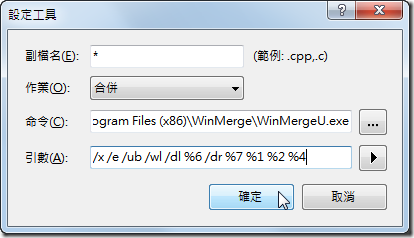
設定資料如下(複製貼上即可)
副檔名:*
作業:合併
命令:C:\Program Files (x86)\WinMerge\WinMergeU.exe
引數:/x /e /ub /wl /dl %6 /dr %7 %1 %2 %4
備註:如果是 x86 架構的作業系統,其命令路徑應該是
C:\Program Files\WinMerge\WinMergeU.exe
設定完後的資料如下,按下確定即可設定完成:

相關連結