許多有在玩 Angular 前端框架的人都知道,目前的 Angular 官網的正體中文版(https://angular.tw)都是由我負責維護。該網站我目前架設於 Azure App Service 上,我原本想用 Azure 上目前免費的 App Service 受控憑證,可惜他並不支援「裸網域」(naked domains),因此我就必須要改申請免費的 Let's Encrypt 網站伺服器憑證。
裸網域 (naked domains) 就是直接拿「頂層域名」(TLD) (Top-Level Domain) 當成網站主要網址。
2021-06-21 更新
目前 App Service 受控憑證已經正式支援「裸網域」(naked domains) 憑證申請,也意味著不需要再透過 Let's Encrypt 申請免費 TLS/SSL 憑證了。
前言
其實要向 Let's Encrypt 註冊免費的 SSL/TLS 憑證有很多輔助工具可用,基本上任何工具只要實作 ACME (Automatic Certificate Management Environment) 協定,就可以順利的向 Let's Encrypt 組織申請到為期 3 個月的免費 SSL/TLS 憑證,其中也可以包含萬用子網域憑證 (*.angular.tw)。
目前 Let's Encrypt 官方有維護一份 Certbot 命令列工具,不但擁有豐富的文件,操作方式也相當簡便,通常只要幾個命令就可以順利產生憑證。不過,就算命令再簡單,對許多人來說還是有點門檻,畢竟扯到「憑證」就會扯到各種 PKI 相關知識,有時候也需要用到 OpenSSL 工具,初學者很容易卡關。
你也可以從 ACME 客戶端查到更多其他人寫的簡便工具,但是這些簡便工具也不是真的都沒有進入障礙,很多命令參數會牽涉到當下的網站執行環境,有時候差一點點就可能會申請失敗。更慘的是,連續失敗個幾次,也有可能會被 Let's Encrypt 限制一段時間無法再次申請憑證。
這篇文章我將以 Certbot 為例,分享完整的 Let's Encrypt 申請與設定步驟!
因為 Certbot 是跨作業系統平台的命令列工具,這邊我以 Windows 10 為例進行示範!
下載 Certbot 命令列工具
請到 https://certbot.eff.org/lets-encrypt/windows-other 下載 certbot-beta-installer-win32.exe 安裝檔,直接執行安裝工具就會自動將工具安裝至 C:\Program Files (x86)\Certbot 目錄下,也會自動設定好 PATH 環境變數。
接著請以系統管理員身份執行開啟 Command Prompt 或 PowerShell 命令列視窗,並測試執行 Certbot 命令:
certbot --version
certbot -h
產生 SSL/TLS 憑證
其實 Certbot 的功能與參數非常多,註冊免費憑證的方法也不少,我這邊就以「手動申請」的步驟進行解說,並以我目前的 angular.tw 網域名稱為範例。
注意:你必須擁有 angular.tw 域名的管理權限,並瞭解 DNS 基本運作原理與設定方式。
請輸入以下命令同時產生 angular.tw 裸網域憑證與 *.angular.tw 萬用子網域憑證:
certbot certonly --manual -m youremail@example.com -d angular.tw -d *.angular.tw
因為加入 --manual 參數的關係,接下來的操作都將會以「互動式」的方式完成設定,可以說相當簡單好上手:
-
顯示偵錯紀錄檔的路徑與要你輸入 y 同意服務使用條款
Saving debug log to C:\Certbot\log\letsencrypt.log
Plugins selected: Authenticator manual, Installer None

- - - - - - - - - - - - - - - - - - - - - - - - - - - - - - - - - - - - - - - -
Please read the Terms of Service at
https://letsencrypt.org/documents/LE-SA-v1.2-November-15-2017.pdf. You must
agree in order to register with the ACME server. Do you agree?
- - - - - - - - - - - - - - - - - - - - - - - - - - - - - - - - - - - - - - - -
(Y)es/(N)o: y
-
問你是不是要提供 E-mail 給 Electronic Frontier Foundation (EFF)?
- - - - - - - - - - - - - - - - - - - - - - - - - - - - - - - - - - - - - - - -
Would you be willing, once your first certificate is successfully issued, to
share your email address with the Electronic Frontier Foundation, a founding
partner of the Let's Encrypt project and the non-profit organization that
develops Certbot? We'd like to send you email about our work encrypting the web,
EFF news, campaigns, and ways to support digital freedom.
- - - - - - - - - - - - - - - - - - - - - - - - - - - - - - - - - - - - - - - -
(Y)es/(N)o: y
Account registered.
這個步驟會將你的 E-mail 自動註冊為 ACME 帳戶!
-
準備發出憑證請求
Requesting a certificate for angular.tw and *.angular.tw
Performing the following challenges:
dns-01 challenge for angular.tw
http-01 challenge for angular.tw
上述訊息很清楚的跟你說有兩個挑戰要完成(dns-01, http-01),通過挑戰才能「證明」你真的擁有該域名!
申請 Let's Encrypt 免費憑證時,通常我們只需要選擇一種挑戰就好,但我今天的範例稍微複雜點,我同時建立了兩個域名的憑證,一個是 angular.tw 單一域名,另一個是 *.angular.tw 萬用域名。如果你想申請單一域名的 SSL/TLS 憑證,只要選擇其中一種挑戰即可(預設用 http-01 挑戰):
certbot certonly --manual --preferred-challenges http -m youremail@example.com -d angular.tw
如果你的網站還沒有上線,沒有對外的網站連結,那麼你就只能用 dns-01 挑戰,此時就可以改用以下命令申請憑證:
certbot certonly --manual --preferred-challenges dns -m youremail@example.com -d angular.tw
不過,若你要申請 *.angular.tw 萬用域名的話,就必須使用 dns-01 挑戰,不能使用 http-01 挑戰,畢竟你要證明「所有子網域」都屬於你的,那就非要修改 DNS 不可了!
-
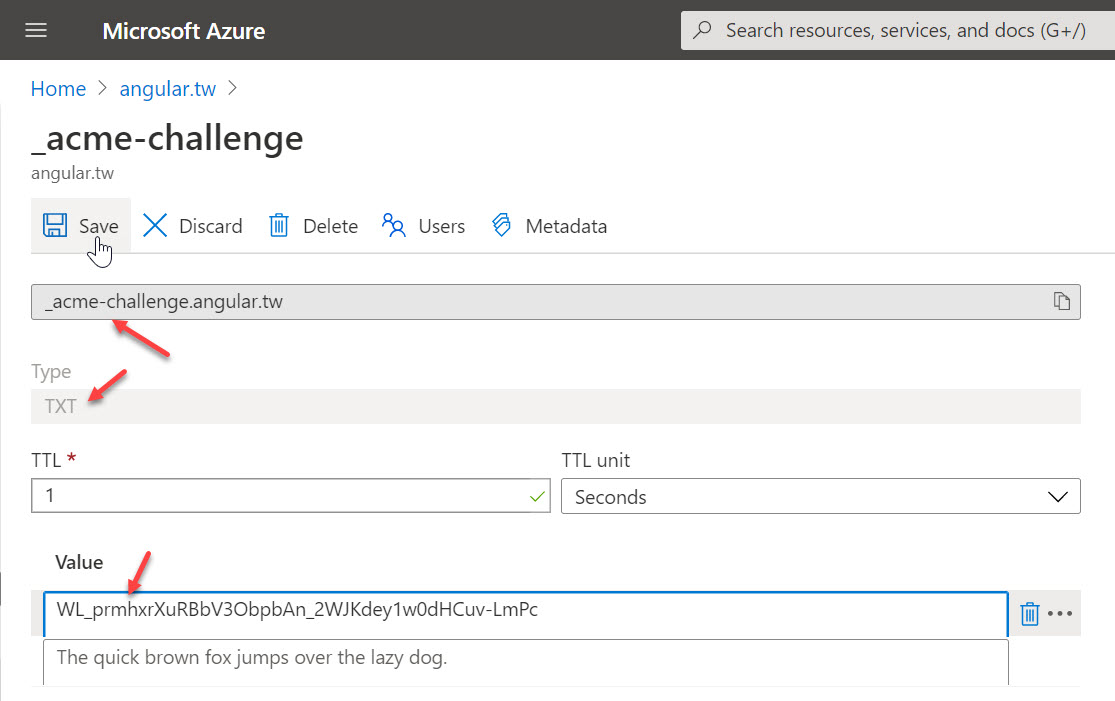
第一個挑戰:dns-01
你必須先新增一筆 TXT 紀錄到 _acme-challenge.angular.tw 的域名上,並將其值設定為 WL_prmhxrXuRBbV3ObpbAn_2WJKdey1w0dHCuv-LmPc,然後按下 Enter 繼續!
- - - - - - - - - - - - - - - - - - - - - - - - - - - - - - - - - - - - - - - -
Please deploy a DNS TXT record under the name
_acme-challenge.angular.tw with the following value:

WL_prmhxrXuRBbV3ObpbAn_2WJKdey1w0dHCuv-LmPc

Before continuing, verify the record is deployed.
- - - - - - - - - - - - - - - - - - - - - - - - - - - - - - - - - - - - - - - -
Press Enter to Continue
你一定要先設定好 DNS 紀錄才能按下 Enter 繼續喔!
-
第二個挑戰:http-01
這個挑戰要你在官網建立一個特殊網址路徑的文字檔案,而且必須可以讓 Let's Encrypt 網站能夠公開存取該網址,而且一定只能走 Port 80 進行 HTTP 連線,不能使用任何其他埠號,如此一來才能驗證你就是該網站的擁有者!
網址路徑:/.well-known/acme-challenge/IKibDaF4-FHZoGw1U6JTyGlBDMOtE-cQCFw13e4FaUc
檔案內容:IKibDaF4-FHZoGw1U6JTyGlBDMOtE-cQCFw13e4FaUc.plEmWe4UXqKWJvuRWXDnZDtkeEh2omjTeQWuZHEKan4
- - - - - - - - - - - - - - - - - - - - - - - - - - - - - - - - - - - - - - - -
Create a file containing just this data:

IKibDaF4-FHZoGw1U6JTyGlBDMOtE-cQCFw13e4FaUc.plEmWe4UXqKWJvuRWXDnZDtkeEh2omjTeQWuZHEKan4

And make it available on your web server at this URL:

http://angular.tw/.well-known/acme-challenge/IKibDaF4-FHZoGw1U6JTyGlBDMOtE-cQCFw13e4FaUc

(This must be set up in addition to the previous challenges; do not remove,
replace, or undo the previous challenge tasks yet.)

- - - - - - - - - - - - - - - - - - - - - - - - - - - - - - - - - - - - - - - -
Press Enter to Continue
注意:網站一定要能夠接聽 Port 80 的 HTTP 連接喔!
最後用瀏覽器確定 http-01 挑戰的網址可以順利打開,才能按下 Enter 繼續!
照理說,這個步驟其實很容易完成,就建立幾個資料夾與一個文字檔案而已。但我的網站不小心在 IIS 設定了一個虛擬目錄(Virtual Directory),導致這個 .well-known 目錄無法存取該檔案。如果你真的遇到這個問題,可以在網站根目錄的 web.config 檔案 (如果沒有這個檔案可以自己建立同名檔案) 加入一條 Rewrite 規則,讓 .well-known/acme-challenge/IKibDaF4-FHZoGw1U6JTyGlBDMOtE-cQCFw13e4FaUc 網址會直接重寫(Rewrite)到 /acme-challenge.txt 路徑,最後到網站根目錄建立一個 acme-challenge.txt 文字檔案,放入應該放入的內容即可:
<?xml version="1.0"?>
<configuration>
  <system.webServer>

    <rewrite>
      <rules>
        <rule name="LetsEncrypt" stopProcessing="true">
          <match url=".well-known/acme-challenge/IKibDaF4-FHZoGw1U6JTyGlBDMOtE-cQCFw13e4FaUc" />
          <action type="Rewrite" url="/acme-challenge.txt" />
        </rule>
      </rules>
    </rewrite>

  </system.webServer>
</configuration>
-
免費憑證申請成功,並顯示憑證檔路徑
當 dns-01 與 http-01 挑戰都能驗證成功,Certbot 會先幫你訂閱一個 EFF mailing list 郵件清單,並提示你憑證 PEM 檔案所在路徑與憑證到期日:
Waiting for verification...
Cleaning up challenges
Subscribe to the EFF mailing list (email: youremail@example.com).

IMPORTANT NOTES:
- Congratulations! Your certificate and chain have been saved at:
  C:\Certbot\live\angular.tw\fullchain.pem
  Your key file has been saved at:
  C:\Certbot\live\angular.tw\privkey.pem
  Your certificate will expire on 2021-05-11. To obtain a new or
  tweaked version of this certificate in the future, simply run
  certbot again. To non-interactively renew *all* of your
  certificates, run "certbot renew"
- If you like Certbot, please consider supporting our work by:

  Donating to ISRG / Let's Encrypt:   https://letsencrypt.org/donate
  Donating to EFF:                    https://eff.org/donate-le
如下圖是 C:\Certbot\live\angular.tw 目錄產生的檔案清單:
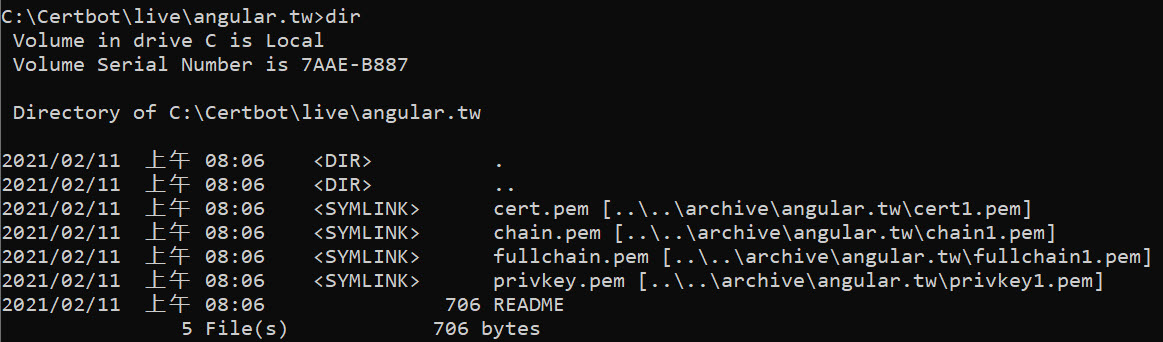
也請務必看一下 README.md 這個說明檔案,裡面有描述每個檔案的用途:
This directory contains your keys and certificates.

`privkey.pem`  : the private key for your certificate.
`fullchain.pem`: the certificate file used in most server software.
`chain.pem`    : used for OCSP stapling in Nginx >=1.3.7.
`cert.pem`     : will break many server configurations, and should not be used
                without reading further documentation (see link below).

WARNING: DO NOT MOVE OR RENAME THESE FILES!
        Certbot expects these files to remain in this location in order
        to function properly!

We recommend not moving these files. For more information, see the Certbot
User Guide at https://certbot.eff.org/docs/using.html#where-are-my-certificates.
如果你想安裝這份 TLS/SSL 憑證到你現有的 Apache, Nginx 網站伺服器,應該都非常簡單,但想安裝到 IIS 就必須再產生 PFX (PKCS#12) 憑證檔案才能安裝。
產生 PFX (PKCS#12) 憑證檔
我們在上一步最後產生的檔案主要有四個 PEM 檔案,分別是:
cert.pem : 主要的伺服器憑證privkey.pem : 伺服器憑證的私密金鑰(private key)(注意:此憑證並未設定密碼)chain.pem : 中繼憑證,有些網站伺服器會需要特別安裝(e.g. OCSP stapling in Nginx >=1.3.7)fullchain.pem: 完整的憑證鏈,裡面包含所有憑證(伺服器憑證+中繼憑證)
如果你用 Windows 的話,其實可以直接把 fullchain.pem 重新更名為 fullchain.cer 就可以用滑鼠雙擊點開,查看憑證資訊。
最後,我們要用 OpenSSL 工具快速產生 PFX 憑證檔,命令如下:
openssl pkcs12 -export -out "certificate_combined.pfx" -inkey "privkey.pem" -in "cert.pem" -certfile "fullchain.pem"
請注意:由於 PFX 憑證被要求一定要設定一組密碼,因此匯出 PFX 憑證時必須設定一組密碼,到時匯入憑證時才能用!
如果你想自動完成 PFX 憑證建立,可以參考以下我常用批次檔寫法:
SET PASSWORD=RPoWr8jhDM8T
"C:\Program Files\Git\usr\bin\openssl.exe" pkcs12 -export -out "G:\certificate_combined.pfx" -inkey "privkey.pem" -in "cert.pem" -certfile "fullchain.pem" -password "pass:%PASSWORD%"
透過上述步驟,就可以產生出任何所需的憑證與金鑰,無論是哪一種網站伺服器或雲端服務都可以順利的安裝才是! ☺
自動 Renew 憑證
其實你在 Windows 安裝 Certbot 的時候,預設就會幫你在控制台的「工作排程器」(Task Scheduler) 建立一個名為 Certbot Renew Task 的工作排程,每天的中午 12:00 與午夜的 00:00 會自動執行 certbot renew 命令,自動幫你申請延長憑證期限,並直接覆寫你在 C:\Certbot\live\* 目錄下的所有憑證檔案。
像是 Apache, Nginx 之類的網站伺服器,都可以直接讀取與設定 PEM 憑證檔案,不用事先轉換為 PFX 格式的憑證。所以你可以在調整網站設定的時候,直接把憑證與金鑰指向到 C:\Certbot\live\*\* 目錄下的檔案,如此一來在憑證自動更新後,伺服器重新載入設定就會自動套用新的憑證,相當便利!
注意:certbot renew 命令可以搭配 --pre-hook 與 --post-hook 參數,讓你在 Renew 前與 Renew 後自動執行一些命令,幫助你自動化憑證更新的必要程序,例如:重新啟動網站伺服器。
雖然這個設計相當不錯,只可惜 Windows 下的 IIS 無福享受,因為使用 Windows 的 IIS 都需要匯入憑證才能重新套用新的憑證,相對麻煩許多,不過若是搭配 --pre-hook 與 --post-hook 參數,還是可以做到自動化更新程序的。如果你確定不需要每天兩次自動執行 certbot renew 的話,建議可以把這個工作排程停用或刪除。你可以使用以下命令停用排程工作:
powershell.exe -NoProfile -Command "&'C:\Program Files (x86)\Certbot\renew-down.ps1'"
如果不停用這個工作,每天中午與半夜就會各執行一次憑證更新,且執行時會跳出一個終端機視窗,然後執行完立刻關閉,你幾乎看不到執行的內容與訊息,但卻會注意到有個程式視窗被啟動後立刻消失。如果不知道是 Certbot 在執行,真的會感覺毛毛的,不知道是不是有病毒或後門在我的電腦裡執行!😅
重新啟用 Certbot 排程,必須以系統管理員身份執行以下命令:
powershell.exe -NoProfile -Command "&'C:\Program Files (x86)\Certbot\renew-up.ps1'"
如果你使用 Nginx 或 Apache 等伺服器,那麼你確實可以做到「自動 Renew 憑證」這個需求,你可以利用 certbot renew --dry-run 命令,測試看看是否可以成功自動更新憑證。但請注意,如果你第一次建立憑證使用 --manual 參數的話,那也意味著 Certbot 無法使用 certbot renew 命令自動重發憑證。
相關連結