每次要開始寫一個 Node.js 搭配 TypeScript 的專案,都沒有一個能讓自己滿意的專案範本,不然就是網路上經常找到不完整的參考文件。這篇文章我打算建立一個 Node.js 搭配 TypeScript 進行開發的專案範本,完整交代整個建置過程,並用一個簡單的例子說明開發與執行的注意事項。
TL;DR (Too Long; Don't Read)
如果你是個大忙人,可以直接使用我寫好的專案範本,跳過以下所有內容:
-
使用 .NET CLI 命令列工具,安裝我寫好的專案範本
dotnet new --install Duotify.Templates.DotNetNew
-
使用 dotnet new tsnode 建立專案範本並執行 npm install 安裝 npm 套件
mkdir punycode-converter && cd punycode-converter
dotnet new tsnode -c "Will 保哥"
npm install
-
開啟 Visual Studio Code 並對 src/app.ts 檔案進行開發
code .
-
按下 Ctrl+Shift+B 即可自動執行 npm start 命令
程式會自動監視檔案變更並自動重啟程式!
準備 Windows 命令列環境
要準備好一個 Node.js 與 TypeScript 的開發環境,你大致需要以下工具:
-
Node.js
-
PowerShell Core (在 Windows 唯一推薦的命令列工作環境)
事實上 PowerShell Core 是跨平台的 Shell 環境,只是 Linux 使用者很少人用
-
UnxUtils (常用的 GNU utilities 工具)
-
curl (模擬 HTTP 命令與下載檔案的好工具)
-
jq (一個專門用來操作 JSON 資料的強大工具)
以下可以用單一命令將環境全部自動裝好:
choco install nodejs-lts powershell-core unxutils curl jq -y
建立 Node.js with TypeScript 專案範本
以下命令同時可以相容於 Linux Shell 與 PowerShell Core 執行環境:
請不要用 Command Prompt 或 Windows 內建的 PowerShell 來執行以下程式碼,使用上地雷太多了,不但使用 Pipe 的時候可能會有檔案編碼問題,命令的輸入方式還無法跨平台相容。以下命令我測試過無數次,可完美相容於於 Linux, macOS 常見的 Shell 環境,請記得額外安裝 curl 與 jq 工具即可!👍
mkdir punycode-converter
cd punycode-converter

npm init -y
npx typescript --init
npx tslint --init

echo 'loglevel=silent' > .npmrc

npm install typescript @types/node tslint nodemon ts-node --save-dev

npx strip-json-comments-cli tsconfig.json | jq '.' | npx sponge tsconfig.json
jq --arg     'outDir' './dist' '.compilerOptions.outDir = $outDir' tsconfig.json | npx sponge tsconfig.json
jq --argjson 'strict' 'false'  '.compilerOptions.strict = $strict' tsconfig.json | npx sponge tsconfig.json

jq --arg 'severity' 'warning' '.defaultSeverity = $severity' tslint.json | npx sponge tslint.json

curl -s https://www.toptal.com/developers/gitignore/api/node > .gitignore

npx node-editorconfig

jq 'del(.scripts.test)' package.json | npx sponge package.json

jq --arg cmd 'nodemon src/app.ts'      '.scripts.start = $cmd' package.json | npx sponge package.json
jq --arg cmd 'tsc'                     '.scripts.build = $cmd' package.json | npx sponge package.json
jq --arg cmd 'tsc && node dist/app.js' '.scripts.node  = $cmd' package.json | npx sponge package.json

mkdir src
touch src/app.ts

npm start
詳細解釋建立 Node.js with TypeScript 專案範本的過程
-
建立專案
請注意目錄名稱的命名規則必須符合 npm 套件名稱的命名規範:
- 套件名稱總長度不得超過 214 字元
- 套件名稱不能有任何英文大寫字元
- 套件名稱不能違反 URL 可用字元的規則
簡單來說,建議都用小寫字元([a-z])與減號(-)就好!
mkdir punycode-converter
cd punycode-converter
如果專案不會發布到 npm registry 的話,那麼 name 是什麼其實不重要!
-
初始化 package.json 檔案
npm init -y
echo 'loglevel=silent' > .npmrc
我設定 loglevel=silent 到 .npmrc 的目的是不希望 npm start 的時候看到一堆沒用的 log 訊息!
-
安裝 TypeScript 必備的 npm 套件
npm install typescript @types/node tslint nodemon ts-node --save-dev
套件 typescript 為 TypeScript 編譯器本身。套件 @types/node 是 Nodejs 的 TypeScript 型別定義檔(declaration file)。套件 tslint 則是 TypeScript 的 Linting 工具,檢查各種 TypeScript 寫作風格。nodemon 用來監控程式碼變更,自動重新執行 Node.js 程式。ts-node 用來直接執行 *.ts 程式,省去手動執行 tsc 編譯的過程。
-
初始化 tsconfig.json 設定檔
這個 tsconfig.json 設定檔主要用來幫助 TypeScript 編譯器判斷該如何編譯我們的專案。
npx typescript --init
在 tsconfig.json 檔案中包含的大量註解,這些註解極具參考價值,但你可以視情況清除這些註解。
npx strip-json-comments-cli tsconfig.json | jq '.' | npx sponge tsconfig.json
初始化 tsconfig.json 之後,我會修改 tsconfig.json 的 compilerOptions.outDir 屬性,讓 TypeScript 編譯好的結果輸出到 ./dist 目錄。
jq --arg 'outDir' './dist' '.compilerOptions.outDir = $outDir' tsconfig.json | npx sponge tsconfig.json
由於 tsconfig.json 預設採用「嚴格型別檢查」功能,有時候我會把 tsconfig.json 的 compilerOptions.strict 設定為 false,以免型別檢查太過嚴格影響開發體驗! XD
jq --argjson 'strict' 'false' '.compilerOptions.strict = $strict' tsconfig.json | npx sponge tsconfig.json
-
初始化 tslint.json 設定檔
npx tslint --init
你可以考慮設定 TSLint 檢查出來的問題標示為「警告」而非「錯誤」!
jq --arg 'severity' 'warning' '.defaultSeverity = $severity' tslint.json | npx sponge tslint.json
-
初始化 .gitignore 設定檔 (gitignore.io)
curl -s https://www.toptal.com/developers/gitignore/api/node > .gitignore
-
初始化 .editorconfig 編輯器設定檔 (node-editorconfig)
npx node-editorconfig
-
修改 package.json 的 scripts 區段,增加一個 npm start 的執行命令
有個 scripts.test 屬性只是個範例,必要時可刪除:
jq 'del(.scripts.test)' package.json | npx sponge package.json
設定執行 tsc 會自動編譯專案目錄下所有 *.ts 檔案並輸出到 dist/ 目錄,接著直接透過 node 啟動該程式!
jq --arg var 'tsc && node dist/app.js' '.scripts.start = $var' package.json | npx sponge package.json
修改之後 packages.json 的 scripts 區段會變成以下內容:
"scripts": {
  "start": "tsc && node dist/app.js"
},
-
改用 nodemon 啟動程式
每次啟動 Node.js 程式都要執行一次 npm start 其實有點不太方便,因為在開發時期一直在更新程式碼,我們的程式需要不斷頻繁的重新啟動。
此時最好的方法,就是有個工具可以不斷監視資料夾中是否有原始碼更新,只要有檔案異動,就自動重新啟動 Node.js 程式,此時就是 nodemon 與 ts-node 上場的時候!當你用 nodemon 執行一個 *.ts 程式,他在內部就會自動使用 ts-node 自動編譯這些程式,並自動透過 node 執行起來,當有程式異動存檔,也會自動重啟程式,非常方便!
jq --arg cmd 'nodemon src/app.ts'      '.scripts.start = $cmd' package.json | npx sponge package.json
jq --arg cmd 'tsc'                     '.scripts.build = $cmd' package.json | npx sponge package.json
jq --arg cmd 'tsc && node dist/app.js' '.scripts.node  = $cmd' package.json | npx sponge package.json
所以我們的 packages.json 的 scripts 區段,就會變成以下內容:
"scripts": {
  "start": "nodemon src/app.ts",
  "build": "tsc",
  "node": "tsc && node dist/app.js"
},
-
建立主程式的原始碼資料夾
mkdir src
touch src/app.ts
-
加入 Visual Studio Code 的 .vscode/tasks.json 工作定義檔
以下定義檔可以讓你按下 Ctrl+Shift+B 就會自動執行 npm start 命令,非常便利!
{
    "version": "2.0.0",
    "tasks": [
        {
            "label": "npm start",
            "type": "shell",
            "command": "npm start",

            "group": {
                "kind": "build",
                "isDefault": true
            },
            "presentation": {
                "showReuseMessage": false,
                "reveal": "always",
                "clear": true,
                "focus": true
            }
        }
    ]
}
開發一段簡短的 Node.js 程式
我打算建立一個 Punycode (國際化域名編碼) 的轉換工具,讓你可將任意 Punycode 轉成 Unicode 字元,或是將 Unicode 字元轉成 Punycode 編碼。
-
安裝會用到的套件與 TypeScript 型別定義檔
這裡我們會使用 Punycode.js 模組來完成這個應用程式。
npm install punycode --save
npm i @types/punycode --save-dev
npm install express@4.17 --save
npm install @types/express@4.17 --save-dev
你可以到 TypeScript: Search for typed packages 搜尋上萬個現成的 TypeScript 型別定義檔
-
正確的在 src/app.ts 載入強型別的模組
一般 Node.js 程式都是用以下方式匯入 CommonJS 模組
const punycode = require('punycode/');
但是在 TypeScript 要換用 import 的方式匯入模組才能參考到正確的型別
import punycode = require('punycode/');
另外用 ESM (ES Modules) 語法也是可以的
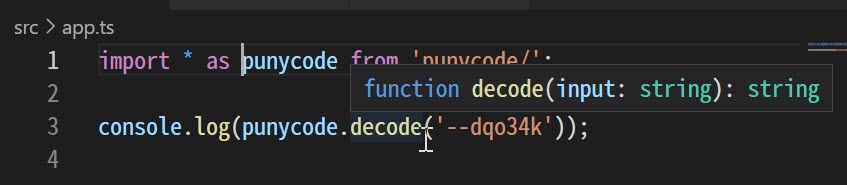
import * as punycode from 'punycode/';
備註:上述範例你看到我匯入的模組名稱是 punycode/,各位可能會覺得有點奇怪,其實是因為 punycode 模組一直都是 Node.js 內建的模組,但是從 v7.0.0 以來,就一直處於 Deprecated (退役) 狀態,官方是說遲早有一天會從 Node.js 中移除,但是至今都尚未移除。短時間內只能透過在名稱後面加上 / 當作暫時的緩解措施(Workaround),否則你會看到如下圖的訊息提示: 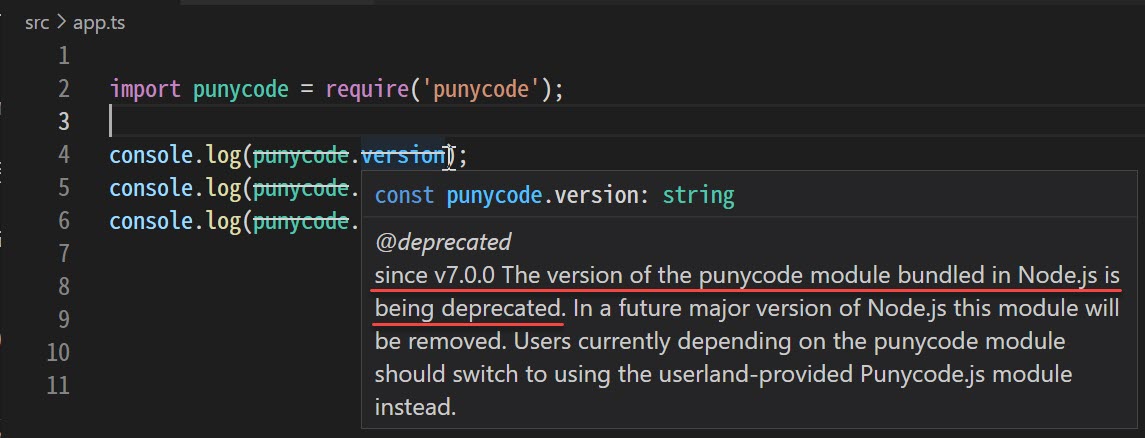
-
只要能正確匯入模組,撰寫程式的時候就可以享受 IntelliSense 提示與型別檢查
console.log(punycode.version);
console.log(punycode.toUnicode('xn--cssyd'));
console.log(punycode.toASCII('多奇'));

-
執行程式
npm start
在 Visual Studio Code 中可以按下 Ctrl+Shift+B 快速鍵,就可以直接啟動程式
-
開發一段簡短的 Express 程式
請在 src/app.ts 填入以下程式碼,過程中可以發現每個變數都有完整的型別標示
import punycode = require('punycode/');
import express from 'express';

const app = express();
const port = 3000;

// http://localhost:3000/toUnicode?str=xn--cssyd
app.get('/toUnicode', (req, res) => {
    res.send(punycode.toUnicode(req.query['str'].toString()));
});

// http://localhost:3000/toASCII?str=多奇
app.get('/toASCII', (req, res) => {
    res.send(punycode.toASCII(req.query['str'].toString()));
});

app.listen(port, () => {
    console.log(`server is listening on ${port}`);
});
![res.send(punycode.toASCII(req.query['str'].toString()));](https://user-images.githubusercontent.com/88981/126068898-93084281-359a-4d2c-ae97-202d0d532e3c.jpg)
在 Visual Studio Code 中可以按下 Ctrl+Shift+B 快速鍵,就可以直接啟動程式。啟動後 nodemon 會自動監視資料夾下的檔案變更,有檔案儲存就會自動重啟程式!
完整的範例程式
https://github.com/doggy8088/punycode-converter
相關連結