每次看到 Scott Hanselman 那套華麗的 PowerShell 命令輸入環境,就覺得自己一定也要設定一個類似的環境,不但使用起來讓人覺得神清氣爽,在同事朋友面前也會顯得出類拔萃。今天這篇文章,我就把設定的過程做個簡單的筆記,照著設定也可以做到一樣的效果。
本文於 2022-08-21 更新過,適用於目前最新版本的安裝過程。
點圖可開啟 打造一個華麗又實用的 PowerShell / Bash 命令輸入環境 的直播影片!
安裝必備工具
-
安裝 winget 套件管理器
目前只有 Windows 10 1709 (組建 16299) 或更新版本才支援 winget 命令列工具。
使用 Microsoft Store 手動安裝
新版的 Windows 10 或 Windows 11 已經內建 winget 工具,如果更舊的 Windows 版本,可以到 Microsoft Store 下載 App Installer 應用程式。
GitHub: https://github.com/microsoft/winget-cli
使用 PowerShell 快速安裝
如果你想在 Windows Sandbox 安裝 winget 工具,那就需要用以下命令自動安裝:
Set-ExecutionPolicy RemoteSigned -Force

$PreRelease = $false

Write-Output 'Fetching Latest Winget CLI Release'
$_LatestUrl = ((Invoke-WebRequest 'https://api.github.com/repos/microsoft/winget-cli/releases' -UseBasicParsing | ConvertFrom-Json).Where({ $_.prerelease -eq $PreRelease }) | Select-Object -First 1).assets.Where({ $_.name -match '^Microsoft.DesktopAppInstaller_8wekyb3d8bbwe.msixbundle$' }).browser_download_url

Write-Output 'Downloading Winget to TEMP folder'
$InstallerFile = $(Join-Path -Path $env:TEMP  -ChildPath 'Microsoft.DesktopAppInstaller_8wekyb3d8bbwe.msixbundle')
[Net.ServicePointManager]::SecurityProtocol = [Net.SecurityProtocolType]::Tls12
$WebClient = New-Object System.Net.WebClient
$WebClient.DownloadFile($_LatestUrl, $InstallerFile)

Write-Output 'Downloading VCLibs'
$VCLibsPath = $(Join-Path -Path $env:TEMP -ChildPath 'Microsoft.VCLibs.x64.14.00.Desktop.appx')
$WebClient.DownloadFile('https://aka.ms/Microsoft.VCLibs.x64.14.00.Desktop.appx', $VCLibsPath)

Write-Output 'Fetching Microsoft UI Nuget Package'
$_UILibsZipPath = Join-Path -Path $env:TEMP -ChildPath 'Microsoft.UI.Xaml.2.7.zip'
$WebClient.DownloadFile('https://www.nuget.org/api/v2/package/Microsoft.UI.Xaml/2.7.0', $_UILibsZipPath)

Write-Output 'Extracting Microsoft UI Appx'
Expand-Archive -Path $_UILibsZipPath -DestinationPath $(Join-Path -Path $env:TEMP -ChildPath 'Microsoft.UI.Xaml.2.7') -Force
$_UILibsAppxPath = Join-Path -Path $env:TEMP -ChildPath 'Microsoft.UI.Xaml.2.7\tools\AppX\x64\Release\Microsoft.UI.Xaml.2.7.appx'

Add-AppxPackage $InstallerFile -DependencyPath $_UILibsAppxPath,$VCLibsPath
-
安裝 Windows Terminal 最新版
winget install Microsoft.WindowsTerminal --accept-source-agreements
-
安裝 PowerShell 7 最新版
winget install Microsoft.PowerShell
-
安裝 Oh My Posh 工具
winget install JanDeDobbeleer.OhMyPosh
自動安裝 oh-my-posh.exe 主程式,並設定 PATH 環境變數。
-
重開 Windows PowerShell 並安裝 Oh My Posh 所需的字型
執行以下命令會直接安裝 CascadiaCode 字型!
oh-my-posh.exe font install CascadiaCode
這些字型都來自於 Nerd Fonts Repo,而 CascadiaCode 字型包裡面有個 CaskaydiaCove NF 字型 (Font face) 包含大量的 glyphs (icons),可以讓你的命令列環境顯示精美的圖示!👍
-
工具安裝完畢後,請改用 Windows Terminal 開啟,你可以選擇 Windows PowerShell (代表 5.1 版) 或是 PowerShell (代表 7.x 版)!
-
調整 Windows Terminal 設定
請將 Windows PowerShell、PowerShell Core、WSL 的 外觀 (Appearance) 調整使用 CaskaydiaCove NF 字型 (Font face)!
建議修改 PowerShell 的啟動參數,命令列的部分加入 -NoLogo 參數:
"C:\Program Files\PowerShell\7\pwsh.exe" -NoLogo
-
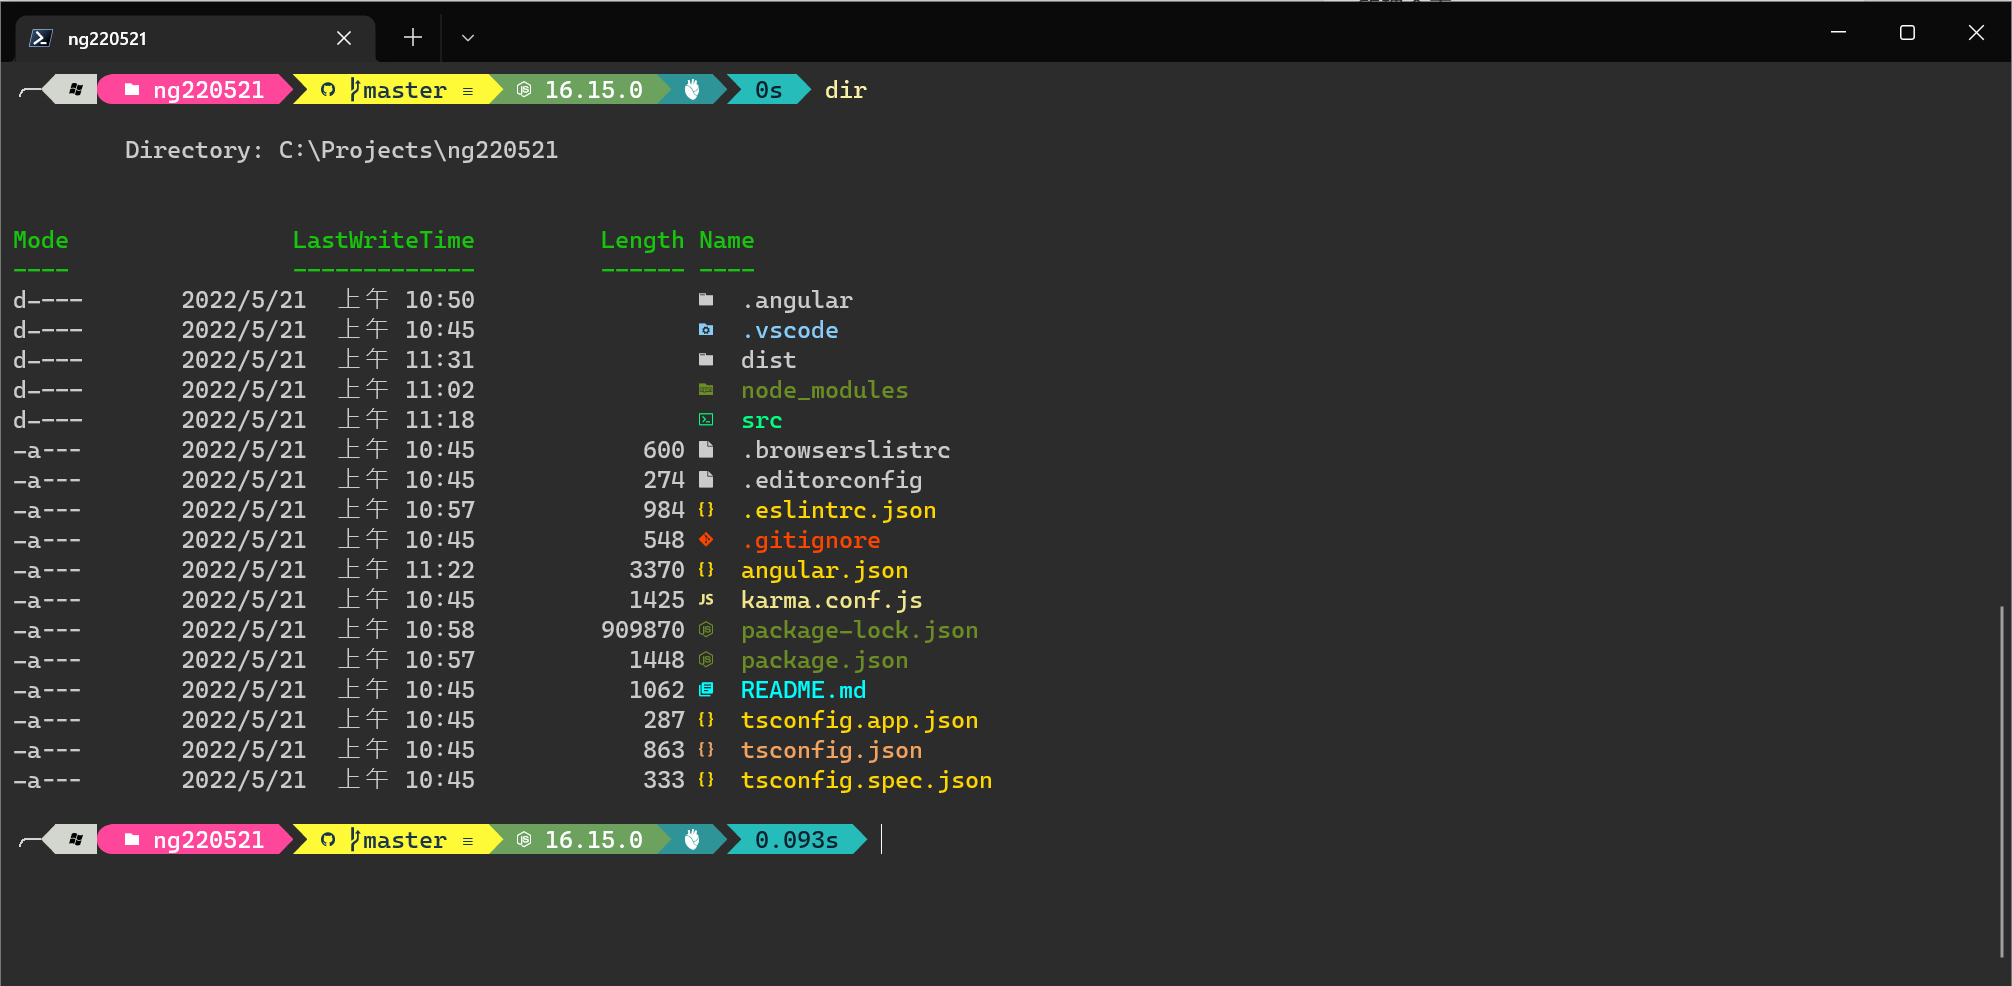
安裝 Terminal-Icons 模組
Install-Module -Name Terminal-Icons -Repository PSGallery -Force
這個模組可以讓你在執行 Get-ChildItem (dir) 的時候會在檔案與資料夾上顯示檔案類型圖示。
-
安裝 PSReadLine 模組
優化 PowerShell 環境的利器,不過只能在 PowerShell 7 執行:
Install-Module PSReadLine -AllowPrerelease -Force
設定好用的 PowerShell 命令輸入環境
-
初始化 $PROFILE 啟動設定檔
[System.IO.Directory]::CreateDirectory([System.IO.Path]::GetDirectoryName($PROFILE))

if (-not (Test-Path -Path $PROFILE -PathType Leaf)) {
  New-Item $PROFILE -Force
}
-
啟用 PSReadLine 並啟用超強自動完成功能
你可以直接將我的 $PROFILE_PSReadLine.ps1 內容加入到 $PROFILE 啟動設定檔中!
(Invoke-WebRequest -Uri 'https://gist.githubusercontent.com/doggy8088/d3f3925452e2d7b923d01142f755d2ae/raw/72d76f9809c46a5887dc2263fb1bbf54052081df/$PROFILE_PSReadLine.ps1').Content | Out-File -LiteralPath $PROFILE -Append -Encoding utf8
-
設定各種命令自動完成提示
你可以直接將我的 $PROFILE_ArgumentCompleter.ps1 內容加入到 $PROFILE 啟動設定檔中!
(Invoke-WebRequest -Uri 'https://gist.githubusercontent.com/doggy8088/2bf2a46f7e65ae4197b6092df3835f21/raw/e5e73da6aabaf51ae49c641f5ca409f38f660443/$PROFILE_ArgumentCompleter.ps1').Content | Out-File -LiteralPath $PROFILE -Append -Encoding utf8
-
加上幾個我自訂的 Cmdlets / Functions 與停用兩個不太實用的 Cmdlet Aliases
你可以直接將我的 $PROFILE_Cmdlets_Functions.ps1 內容加入到 $PROFILE 啟動設定檔中!
(Invoke-WebRequest -Uri 'https://gist.githubusercontent.com/doggy8088/553c4548492b63e4ccbe30d843de85f6/raw/5b8492883519ffbd74557e26d7eaf73dc2692c23/$PROFILE_Cmdlets_Functions.ps1').Content | Out-File -LiteralPath $PROFILE -Append -Encoding utf8
-
匯入 Terminal-Icons 模組
'Import-Module -Name Terminal-Icons' | Out-File -LiteralPath $PROFILE -Append -Encoding utf8
-
啟動 Oh My Posh 的 Shell 環境
立即啟用 Oh My Posh 的命令列提示 (Prompt)
oh-my-posh init pwsh | Invoke-Expression
啟動後,你就可以透過 Get-PoshThemes 快速顯示所有的 Themes 樣式,選一個自己喜歡的版本! 😍
假設你選擇 atomicBit 的話,就可以這樣重新啟動:
oh-my-posh init pwsh --config "$env:POSH_THEMES_PATH\atomicBit.omp.json" | Invoke-Expression
然後將以下命令加入到 $PROFILE 啟動設定檔中
'oh-my-posh init pwsh --config "$env:POSH_THEMES_PATH\atomicBit.omp.json" | Invoke-Expression' | Out-File -LiteralPath $PROFILE -Append -Encoding utf8
-
下載並啟用我自製的 will.omp.yml 設定檔
立即啟用 Oh My Posh 的命令列提示 (Prompt)
Invoke-WebRequest -Uri "https://gist.githubusercontent.com/doggy8088/5dbf60c03ac752b4d80d00bf8c36d6d3/raw/94a2b92f4e3e68bc3413e070f399f6f79cd325bf/will.omp.yml" -OutFile "$env:POSH_THEMES_PATH/will.omp.yaml"
選擇 will 的話,就可以這樣重新啟動:
oh-my-posh init pwsh --config "$env:POSH_THEMES_PATH\will.omp.yaml" | Invoke-Expression
然後將以下命令加入到 $PROFILE 啟動設定檔中
'oh-my-posh init pwsh --config "$env:POSH_THEMES_PATH\will.omp.yaml" | Invoke-Expression' | Out-File -LiteralPath $PROFILE -Append -Encoding utf8
-
重新啟動 Windows Terminal 或重新載入 $PROFILE 啟動設定檔
你可以使用點表示法重新載入 $PROFILE 啟動設定檔:
. $PROFILE
設定 WSL 下的 Bash 也使用 Oh My Posh 提示
-
安裝 Oh My Posh 到 Linux
sudo wget https://github.com/JanDeDobbeleer/oh-my-posh/releases/latest/download/posh-linux-amd64 -O /usr/local/bin/oh-my-posh
sudo chmod +x /usr/local/bin/oh-my-posh
-
下載官方的 Oh My Posh 設定檔
mkdir ~/.poshthemes
wget https://github.com/JanDeDobbeleer/oh-my-posh/releases/latest/download/themes.zip -O ~/.poshthemes/themes.zip
unzip ~/.poshthemes/themes.zip -d ~/.poshthemes
chmod u+rw ~/.poshthemes/*.omp.*
rm ~/.poshthemes/themes.zip
-
套用命令列提示 (Prompt)
eval "$(oh-my-posh init bash)"
-
下載並啟用我自製的 will.omp.yaml 設定檔
curl -sSL https://gist.githubusercontent.com/doggy8088/5dbf60c03ac752b4d80d00bf8c36d6d3/raw/94a2b92f4e3e68bc3413e070f399f6f79cd325bf/will.omp.yml -o ~/.poshthemes/will.omp.yaml
將啟用命令加入到 ~/.bashrc 啟動設定檔並自動重新載入設定
echo 'eval "$(oh-my-posh init bash --config ~/.poshthemes/will.omp.yaml)"' >> ~/.bashrc
. ~/.bashrc
相關連結