我們最近有個 Angular 專案需要用到多國語系架構,所以重新看了一遍 Angular Internationalization 官方文件,並且實際操作了一遍,這篇文章我就稍微記錄一下這個過程與注意事項。

簡介多國語系架構
國際化 (Internationalization) 又稱為 i18n,是為了讓您的專案適用於世界各地的不同地區而進行的設計和準備過程。
本地化 (Localization) 是為不同地區建立您的專案版本的過程。本地化過程包括以下動作:
地區設定 (Locale) 則用來識別一個地區,在這個地區人們講某種特定語言或語言變體。可能的地區包括國家和地理區域。地區設定確定以下細節的格式化和解析。
- 包括日期和時間、數字和貨幣在內的測量單位
- 翻譯名稱,包括時區、語言和國家
Angular 的 DatePipe, CurrencyPipe, DecimalPipe, PercentPipe 管道 (Pipes) 都有內建根據 Locale 進行本地化格式的轉換。
想要快速瞭解本地化和國際化,請到 Angular 國際化 觀看有中文字幕的影片!
對專案設定本地化套件
-
建立全新專案
ng new ng-i18n-demo --ssr=false --style=css
cd ng-i18n-demo
-
新增 @angular/localize 套件
ng add @angular/localize
這個命令的變更記錄可以從這裡查看完整變更記錄
預設 Angular 的本地化套件,會在 ng build 的時候將所有的本地化資源都打包進去,以提升執行效能。但如果你想在 Component 的 TypeScript 檔案中使用 $localize 來將標記範本文字字串進行本地化,那就要用以下命令初始化:
ng add @angular/localize --use-at-runtime
到這個步驟為止,這兩種 ng add 方法並沒有太大差異,唯一差別僅在於 @angular/localize 套件是註冊在 devDependencies 或 dependencies 的差別而已。
-
定義來源 Locale 與目標 Locale 設定
我們在開發網站時,主要以什麼 Locale 為主?Angular 預設為 en-US,但如果你想要以「繁體中文」為主的話,要設定為 zh-Hant 才是正確的,要注意不要設定成 zh-TW 喔,因為 @angular/common 套件內並沒有包含 zh-TW 或 zh-Hant-TW 地區設定!
至於不包含 zh-TW 或 zh-Hant-TW 地區設定的原因,是因為 Angular 依循 Unicode CLDR Project 的國際化定義,目前 CLDR 就真的沒有列出台灣的地區設定,所以才不支援的。
目標 Locale 可以設定多國語言,其中需定義翻譯檔的路徑,還有網站的 baseHref 路徑!
修改你的 angular.json 設定檔,在主要的 Angular 專案設定下,加入 i18n 設定,範例如下:
{
  "$schema": "./node_modules/@angular/cli/lib/config/schema.json",
  "version": 1,
  "newProjectRoot": "projects",
  "projects": {
    "ng-i18n-demo": {
      "projectType": "application",
      "schematics": {},
      "root": "",
      "sourceRoot": "src",
      "prefix": "app",

      "i18n": {
        "sourceLocale": "zh-Hant",
        "locales": {
          "en-US": {
            "translation": "src/locale/messages.en-US.xlf",
            "baseHref": "/en-US/"
          }
        }
      },
上述設定是定義 ng-i18n-demo 專案的 sourceLocale 為 zh-Hant,並且定義 en-US 為目標 Locale,翻譯檔的路徑為 src/locale/messages.en-US.xlf (等等我們會建立),網站的 baseHref 路徑為 /en-US/,也代表網站未來部署的網站路徑會從 /en-US/ 開始瀏覽。
-
設定 ng build 的時候要一次建置多國語言網站
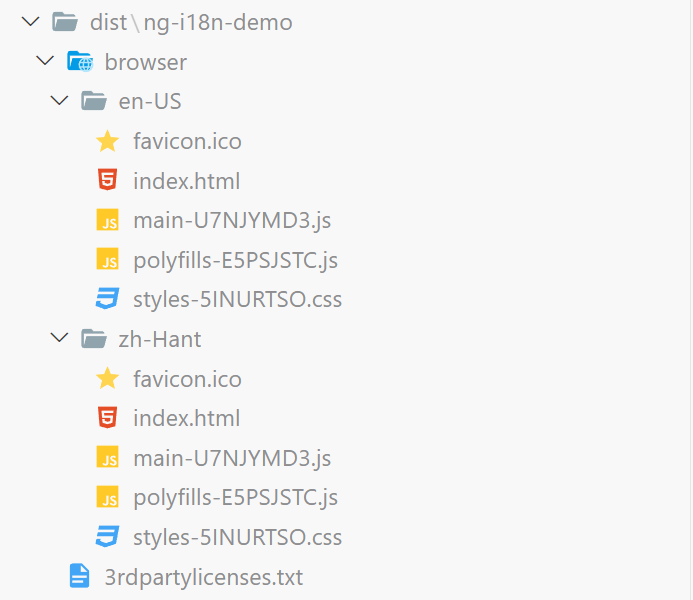
Angular 內建的 i18n 功能,事實上是在建置時會替每一個 Locale 分別建置應用程式,如果你在上個步驟定義 zh-Hant 為來源 Locale 與定義一個 en-US 為目標網站的話,最後在用 ng build 的時候,就會建置出兩個網站出來,分別是讓你部署到網站的 /zh-Hant/ 與 /en-US/ 目錄下。
你可以用 ng build --localize 一次建置多個網站,也可以在 angular.json 的 architect.build.options 設定區段中加入 "localize": true 選項設定,這樣你直接執行 ng build 就可以一口氣建置多個網站了!
下圖是多國語系網站在部署時的目錄結構,基本上一個 Locale 就會有一組網站應用程式被輸出:
你可以在 angular.json 的 architect.build.options 設定區段中加入 "i18nMissingTranslation": "error" 選項設定,這樣在 ng build 的時候,若發現有沒有翻譯到的單元,就會直接報錯!
-
建立開發時期所需的組態設定檔
我們在開發多國語系網站時,會需要測試不同 Locale 的效果,但你用 ng serve 測試網站的時候,一次只能看一個 Locale 的網站,所以我們要對 angular.json 進行設定,讓我們可以用以下命令,啟動單一個 Locale 的版本。
ng serve --configuration=en-US
首先,我們可以在 production 組態加入以下兩項設定:
"zh-Hant": {
  "localize": ["zh-Hant"],
  "baseHref": "/zh-Hant/"
},
"en-US": {
  "localize": ["en-US"],
  "baseHref": "/en-US/"
}
而在 serve 組態也要加入以下兩項設定:
"zh-Hant": {
  "buildTarget": "ng-i18n-demo:build:development,zh-Hant"
},
"en-US": {
  "buildTarget": "ng-i18n-demo:build:development,en-US"
}
注意: Angular 16 以前要將 buildTarget 修改為 browserTarget 才能正常運作。
步驟 3 到步驟 5 的 angular.json 設定,可以從這裡查看完整的變更記錄。
開始對專案進行本地化翻譯
-
在 Template 套用 i18n 屬性,用於「標記」要翻譯的文字
最簡單的用法,有以下三種。
第一種:直接在任意標籤上套用 i18n 屬性
<p i18n>恭喜!你的應用程式正在運行中!🎉</p>
第二種:在 <ng-container> 標籤上套用 i18n 屬性,最終輸出的文字不會包含額外的 DOM 元素
<ng-container i18n>哈囉</ng-container>
第三種:在任意標籤上套用 i18n 屬性並給予一個翻譯的註記(Note),方便日後翻譯人員翻譯成其他地區語言:
<ng-container i18n="放置在首頁的招呼語">哈囉</ng-container>
第四種:在任意標籤上套 i18n-* 屬性,標記特定 HTML Attribute 的內容需要翻譯
<div class="left-side" i18n-title title="這是 Angular 標誌">
第五種:在 *.ts 檔案中使用 $localize 來標記字串需要翻譯
title = $localize`i18n範例`;
-
標記完成後,程式或範本中的內容預設就是 sourceLocale 的預設內容,但是翻譯的內容就要靠 Angular CLI 提供的命令來自動產生,也就是產生所需的翻譯檔。
首先,我們要先擷取所有標記需要翻譯的內容並且自動產生翻譯檔,命令如下:
# 產生預設 Locale 的翻譯檔
ng extract-i18n --output-path "src/locale"
# 產生 en-US Locale 的翻譯檔
ng extract-i18n --output-path "src/locale" --out-file "messages.en-US.xlf"
這個命令會把需要翻譯的 xlf 檔案輸出到 src/locale/messages.en-US.xlf 路徑下。如果有多國語系要輸出翻譯檔,就執行多次即可,例如:
ng extract-i18n --output-path "src/locale"
ng extract-i18n --output-path "src/locale" --out-file "messages.en-US.xlf"
ng extract-i18n --output-path "src/locale" --out-file "messages.ja-JP.xlf"
ng extract-i18n --output-path "src/locale" --out-file "messages.zh-Hans.xlf"
-
開始翻譯
我們先來看看 src/locale/messages.en-US.xlf 檔案的內容,這是一份 XML 檔案,明確定義了要翻譯的內容,其中 <trans-unit> 就代表一個翻譯單元,裡面的 <source> 標籤定義了要被翻譯的內容:
<?xml version="1.0" encoding="UTF-8" ?>
<xliff version="1.2" xmlns="urn:oasis:names:tc:xliff:document:1.2">
  <file source-language="zh-Hant" datatype="plaintext" original="ng2.template">
    <body>
      <trans-unit id="822056772914261675" datatype="html">
        <source>這是 Angular 標誌</source>
        <context-group purpose="location">
          <context context-type="sourcefile">src/app/app.component.html</context>
          <context context-type="linenumber">182,183</context>
        </context-group>
      </trans-unit>
      <trans-unit id="8022582046775660363" datatype="html">
        <source>哈囉</source>
        <context-group purpose="location">
          <context context-type="sourcefile">src/app/app.component.html</context>
          <context context-type="linenumber">228</context>
        </context-group>
        <note priority="1" from="description">放置在首頁的招呼語</note>
      </trans-unit>
      <trans-unit id="1136077837762423862" datatype="html">
        <source>恭喜!你的應用程式正在運行中!🎉</source>
        <context-group purpose="location">
          <context context-type="sourcefile">src/app/app.component.html</context>
          <context context-type="linenumber">229,230</context>
        </context-group>
      </trans-unit>
      <trans-unit id="2065990894244085449" datatype="html">
        <source>i18n範例</source>
        <context-group purpose="location">
          <context context-type="sourcefile">src/app/app.component.ts</context>
          <context context-type="linenumber">13</context>
        </context-group>
      </trans-unit>
    </body>
  </file>
</xliff>
我們在每一個 <trans-unit> 翻譯單元中,要在 <source> 後面自行加入一個 <target> 標籤,並加入翻譯後的內容!
分享一個 GitHub Copilot 的咒語給大家:請將每個 trans-unit 加入 <target> 標籤並翻譯為英文
以下是翻譯完成的結果:
<?xml version="1.0" encoding="UTF-8" ?>
<xliff version="1.2" xmlns="urn:oasis:names:tc:xliff:document:1.2">
  <file source-language="zh-Hant" datatype="plaintext" original="ng2.template">
    <body>
      <trans-unit id="822056772914261675" datatype="html">
        <source>這是 Angular 標誌</source>
        <target>This is the Angular logo</target>
        <context-group purpose="location">
          <context context-type="sourcefile">src/app/app.component.html</context>
          <context context-type="linenumber">182,183</context>
        </context-group>
      </trans-unit>
      <trans-unit id="8022582046775660363" datatype="html">
        <source>哈囉</source>
        <target>Hello</target>
        <context-group purpose="location">
          <context context-type="sourcefile">src/app/app.component.html</context>
          <context context-type="linenumber">228</context>
        </context-group>
        <note priority="1" from="description">放置在首頁的招呼語</note>
      </trans-unit>
      <trans-unit id="1136077837762423862" datatype="html">
        <source>恭喜!你的應用程式正在運行中!🎉</source>
        <target>Congratulations! Your application is running! 🎉</target>
        <context-group purpose="location">
          <context context-type="sourcefile">src/app/app.component.html</context>
          <context context-type="linenumber">229,230</context>
        </context-group>
      </trans-unit>
      <trans-unit id="2065990894244085449" datatype="html">
        <source>i18n範例</source>
        <target>i18n example</target>
        <context-group purpose="location">
          <context context-type="sourcefile">src/app/app.component.ts</context>
          <context context-type="linenumber">13</context>
        </context-group>
      </trans-unit>
    </body>
  </file>
</xliff>
-
翻譯完成後,可以用以下命令來預覽結果
ng serve --configuration=en-US
進階翻譯技巧
我們以這段為例:
<ng-container i18n="放置在首頁的招呼語">哈囉</ng-container>
我們抓 <trans-unit> 出來看看,裡面有個 id 代表這個翻譯的唯一編號,又稱 Custom ID:
<trans-unit id="8022582046775660363" datatype="html">
  <source>哈囉</source>
  <target>Hello</target>
  <context-group purpose="location">
    <context context-type="sourcefile">src/app/app.component.html</context>
    <context context-type="linenumber">228</context>
  </context-group>
  <note priority="1" from="description">放置在首頁的招呼語</note>
</trans-unit>
這個 Custom ID 是自動產生的,但你只要變更了 <source> 原始內容,這個 Custom ID 就會改變,因為不同的文字,可能代表著不同的含意,因此 Custom ID 變了,意味著多國語系的翻譯也要一起重新翻譯。
不過,即便是一段相同的文字,在不同的語境底下,可能是不同的含意,如此一來翻譯就有可能會有問題。這個時候,我們其實可以在「翻譯標記」上面加上一些 Metadata,讓相同的一段文字也可以有不同的 Custom ID,也就代表會有多份翻譯的意思。
事實上,這個 Custom ID 是依據 meaning (含意) 與 text (文字) 自動計算出來的,我們可以用以下格式定義翻譯標記的 Metadata:
{meaning}|{description}@@{id}
你不一定要明確指定 {id} (通常不需要),但只要能指定額外的 meaning 的部分,不同的 meaning 就會產生不同的 Custom ID。
你可以在 i18n 屬性(Attribute)的內容用 | 分隔 {meaning} 與 {description},例如:
<ng-container i18n="招呼語|放置在首頁的招呼語">哈囉</ng-container>
這段「招呼語」就是 meaning,而「放置在首頁的招呼語」就是 description,還有「哈囉」就是 text 本文部分。
如果是在 *.ts 中,你可以用 : 分隔 Metadata 與要翻譯的內容,其表示法為:
title = $localize`:網站標題|這是本網站的主要標題:i18n範例`;
請注意不要忽略字串中的第一個字元為 : 喔!
如此一來,你在產生新的 xlf 翻譯檔的時候,就會看到 meaning 的註記:
ng extract-i18n --output-path src/locale --out-file messages.en-US.xlf
<trans-unit id="7033928152690784306" datatype="html">
  <source>哈囉</source>
  <target>Hello</target>
  <context-group purpose="location">
    <context context-type="sourcefile">src/app/app.component.html</context>
    <context context-type="linenumber">228</context>
  </context-group>
  <note priority="1" from="description">放置在首頁的招呼語</note>
  <note priority="1" from="meaning">招呼語</note>
我用以下範例說明:
<ng-container i18n="招呼語|放置在首頁的招呼語">哈囉</ng-container>
<ng-container i18n="內文招呼語|放置在內文的招呼語">哈囉</ng-container>
執行完 ng extract-i18n 之後,會產生兩段翻譯單元:
<trans-unit id="7033928152690784306" datatype="html">
  <source>哈囉</source>
  <context-group purpose="location">
    <context context-type="sourcefile">src/app/app.component.html</context>
    <context context-type="linenumber">228</context>
  </context-group>
  <note priority="1" from="description">放置在首頁的招呼語</note>
  <note priority="1" from="meaning">招呼語</note>
</trans-unit>
<trans-unit id="2211465157521451795" datatype="html">
  <source>哈囉</source>
  <context-group purpose="location">
    <context context-type="sourcefile">src/app/app.component.html</context>
    <context context-type="linenumber">230,231</context>
  </context-group>
  <note priority="1" from="description">放置在內文的招呼語</note>
  <note priority="1" from="meaning">內文招呼語</note>
</trans-unit>
注意事項
-
你在開發時期更新 src/locale/messages.*.xlf 翻譯檔的時候,並不會即時反應在瀏覽器上,每次有更新都必須重新執行 ng serve 才會生效。
理論上你沒必要每翻譯一個 <trans-unit> 就看一次網頁的翻譯效果,所以這個問題影響不大。
-
每次執行 ng extract-i18n 命令時,都會覆寫之前翻譯好的檔案,這點就不是非常方便,要小心檔案被覆蓋
這個算是個缺點,如果你關注這個 DX 議題,可以追蹤這個 Issue: #23428
基本上,你可多利用 Git 版控,可以在版控時將蓋掉的內容還原回來。
除此之外,你也可以利用 ng-extract-i18n-merge 套件,這個工具會自動取代 Angular CLI 內建的 extract-i18n builder,並且在執行 ng extract-i18n 命令時,會自動將翻譯檔案合併,而不是覆蓋。
ng add ng-extract-i18n-merge
執行完上述命令後,你的 angular.json 會自動更新,之後就只要這樣執行即可:
ng extract-i18n
目前這套還有點問題,等待作者解決。
-
多國語翻譯這件事沒有想像中簡單,中文比較沒有單數與複數的概念,但其他語言就有這些特性,因此在做多國語系網站時要考量的地方還有很多,建議把 Work with translation files 文件看完,裡面有很多細節需要注意。
相關連結