我在兩個月前所撰寫的 如何在 ASP.NET Core 2.2 使用 Token-based 身分驗證與授權 (JWT) 文章,雖然到了 ASP․NET Core 3 之後所有程式碼都是可以用的,但是專案架構設定的過程變得有點不太一樣,因此寫這篇文章說明其差異。
ASP․NET Core 3.0 移除了大量內建 NuGet 套件
你從 What's new in ASP.NET Core 3.0 的 Use the ASP.NET Core shared framework 章節可以發現,以前你在 ASP․NET Core 2.x 專案需要特別在 *.csproj 專案檔中特別加入 Microsoft.AspNetCore.App 的套件參考(<PackageReference />),但是從 ASP․NET Core 3.0 開始就不需要了。也就是說 Microsoft.AspNetCore.App 已經成為了 ASP.NET Core 3.0 shared framework 的一部分,當你安裝好 .NET Core SDK 或 .NET Runtime 的時候,就已經先安裝好了。
只要你 *.csproj 專案檔的第一行參考 <Project Sdk="Microsoft.NET.Sdk.Web"> 就代表已經包含了 Microsoft.AspNetCore.App 中繼套件!
不過,你更需要知道的是,從 ASP․NET Core 3.0 開始,這個 Microsoft.AspNetCore.App 中繼套件移除了大量以前內建的 NuGet 套件,以至於你從 ASP․NET Core 2.x 升級上來的專案將會無法順利編譯。被移除的 NuGet 套件中,其中比較值得一提的有:
完整的移除套件清單,可以從 Assemblies being removed from Microsoft.AspNetCore.App 3.0 #3755 看到。
沒錯,你應該有發現 Microsoft.AspNetCore.Authentication.JwtBearer 就在這次升級的過程中被移除,因此我的這篇文章要能順利實作,必須手動加裝這個套件才行:
dotnet add package Microsoft.AspNetCore.Authentication.JwtBearer
移除 System.IdentityModel.Tokens.Jwt 套件
由於 Microsoft.AspNetCore.Authentication.JwtBearer 套件的 3.1.0 版本,已經把 System.IdentityModel.Tokens.Jwt 設定為相依套件,因此你完全可以直接從 *.csproj 專案檔中移除 System.IdentityModel.Tokens.Jwt 套件參考。
以下是新版專案的 *.csproj 內容,變得相當乾淨清爽:
<Project Sdk="Microsoft.NET.Sdk.Web">

  <PropertyGroup>
    <TargetFramework>netcoreapp3.1</TargetFramework>
  </PropertyGroup>

  <ItemGroup>
    <PackageReference Include="Microsoft.AspNetCore.Authentication.JwtBearer" Version="3.1.0" />
  </ItemGroup>

</Project>
請小心意外載入的 Newtonsoft.Json 套件
因為 .NET Core 3.0 內建 System.Text.Json 命名空間,用來更有效率的處理 JSON 序列化與反序列化,並完整移除所有套件對 Newtonsoft.Json 的依賴。
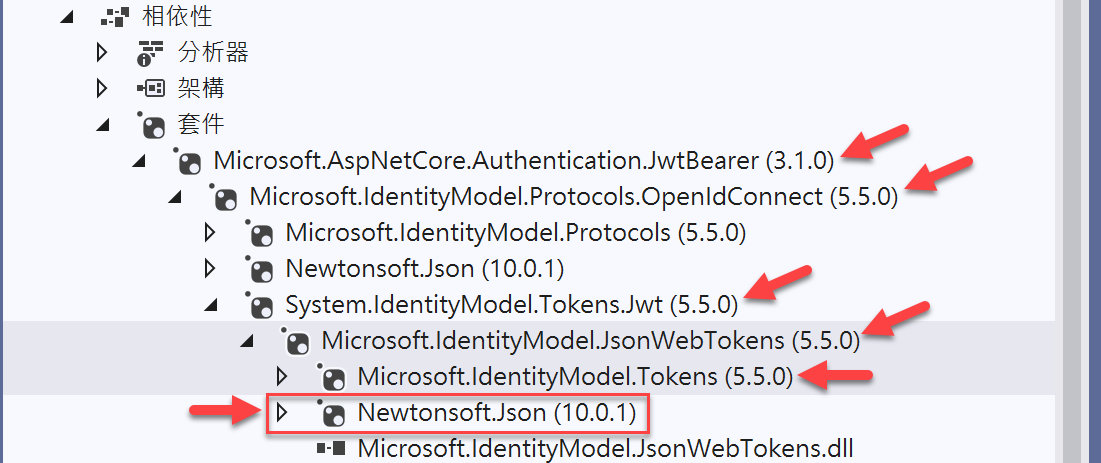
當你進一步分析 Microsoft.AspNetCore.Authentication.JwtBearer 套件的相依性時,會發現 Newtonsoft.Json 套件竟然被包含在內,這非常有可能是一顆隱藏版的地雷。
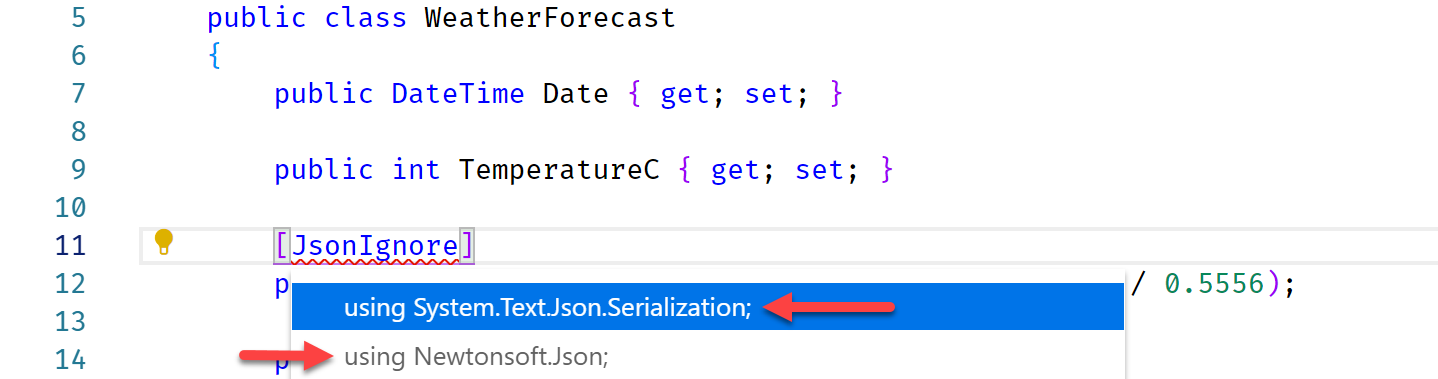
我們經常使用的 [JsonIgnore] 屬性,到了 .NET Core 3.0 要記得選用 System.Text.Json.Serialization 命名空間,但是如果你不小心把 Newtonsoft.Json 套件載入的話,在選擇命名空間時,就要小心不要選錯了!
重點摘要
要在專案中採用 JWT 進行 Token-based 的身分驗證與授權實作,其中只包含了三個部分:
- 產生合法有效的 JWT Token
- 驗證合法有效的 JWT Token
- 限制特定 API 只能在通過 JWT 驗證的 HTTP 要求才能存取
初始化專案
本篇文章以 ASP.NET Core 3.1 為主,所以我們先建立一個最陽春的 Web API 專案:
-
先建立 global.json 檔案,將 .NET Core SDK 限定在 3.1.100 版本
dotnet new globaljson --sdk-version 3.1.100
-
建立 JwtAuthDemo 專案
dotnet new webapi -n JwtAuthDemo
cd JwtAuthDemo
-
安裝 Microsoft.AspNetCore.Authentication.JwtBearer 套件
dotnet add package Microsoft.AspNetCore.Authentication.JwtBearer
產生合法有效的 JWT Token
這部分我寫了一個 Helpers/JwtHelpers.cs 檔案,裡面有個 GenerateToken() 方法,所有說明直接放在程式碼註解中:
using Microsoft.Extensions.Configuration;
using Microsoft.IdentityModel.Tokens;
using System;
using System.Collections.Generic;
using System.Security.Claims;
using System.Text;
using System.IdentityModel.Tokens.Jwt;

namespace JwtAuthDemo.Helpers
{
    public class JwtHelpers
    {
        private readonly IConfiguration Configuration;

        public JwtHelpers(IConfiguration configuration)
        {
            this.Configuration = configuration;
        }
        public string GenerateToken(string userName, int expireMinutes = 30)
        {
            var issuer = Configuration.GetValue<string>("JwtSettings:Issuer");
            var signKey = Configuration.GetValue<string>("JwtSettings:SignKey");

            // 設定要加入到 JWT Token 中的聲明資訊(Claims)
            var claims = new List<Claim>();

            // 在 RFC 7519 規格中(Section#4),總共定義了 7 個預設的 Claims,我們應該只用的到兩種!
            //claims.Add(new Claim(JwtRegisteredClaimNames.Iss, issuer));
            claims.Add(new Claim(JwtRegisteredClaimNames.Sub, userName)); // User.Identity.Name
            //claims.Add(new Claim(JwtRegisteredClaimNames.Aud, "The Audience"));
            //claims.Add(new Claim(JwtRegisteredClaimNames.Exp, DateTimeOffset.UtcNow.AddMinutes(30).ToUnixTimeSeconds().ToString()));
            //claims.Add(new Claim(JwtRegisteredClaimNames.Nbf, DateTimeOffset.UtcNow.ToUnixTimeSeconds().ToString())); // 必須為數字
            //claims.Add(new Claim(JwtRegisteredClaimNames.Iat, DateTimeOffset.UtcNow.ToUnixTimeSeconds().ToString())); // 必須為數字
            claims.Add(new Claim(JwtRegisteredClaimNames.Jti, Guid.NewGuid().ToString())); // JWT ID

            // 網路上常看到的這個 NameId 設定是多餘的
            //claims.Add(new Claim(JwtRegisteredClaimNames.NameId, userName));

            // 這個 Claim 也以直接被 JwtRegisteredClaimNames.Sub 取代,所以也是多餘的
            //claims.Add(new Claim(ClaimTypes.Name, userName));

            // 你可以自行擴充 "roles" 加入登入者該有的角色
            claims.Add(new Claim("roles", "Admin"));
            claims.Add(new Claim("roles", "Users"));

            var userClaimsIdentity = new ClaimsIdentity(claims);

            // 建立一組對稱式加密的金鑰,主要用於 JWT 簽章之用
            var securityKey = new SymmetricSecurityKey(Encoding.UTF8.GetBytes(signKey));

            // HmacSha256 有要求必須要大於 128 bits,所以 key 不能太短,至少要 16 字元以上
            // https://stackoverflow.com/questions/47279947/idx10603-the-algorithm-hs256-requires-the-securitykey-keysize-to-be-greater
            var signingCredentials = new SigningCredentials(securityKey, SecurityAlgorithms.HmacSha256Signature);

            // 建立 SecurityTokenDescriptor
            var tokenDescriptor = new SecurityTokenDescriptor
            {
                Issuer = issuer,
                //Audience = issuer, // 由於你的 API 受眾通常沒有區分特別對象,因此通常不太需要設定,也不太需要驗證
                //NotBefore = DateTime.Now, // 預設值就是 DateTime.Now
                //IssuedAt = DateTime.Now, // 預設值就是 DateTime.Now
                Subject = userClaimsIdentity,
                Expires = DateTime.Now.AddMinutes(expireMinutes),
                SigningCredentials = signingCredentials
            };

            // 產出所需要的 JWT securityToken 物件,並取得序列化後的 Token 結果(字串格式)
            var tokenHandler = new JwtSecurityTokenHandler();
            var securityToken = tokenHandler.CreateToken(tokenDescriptor);
            var serializeToken = tokenHandler.WriteToken(securityToken);

            return serializeToken;
        }
    }
}
上述範例程式由於需要讀取組態設定,因此所需的 issuer 與 signKey 請記得調整 appsettings.json 設定檔,或透過其他組態提供者提供該設定 (例如:環境變數、命令列參數、User Secrets、...):
{
  "JwtSettings": {
    "Issuer": "JwtAuthDemo",
    "SignKey": "1Zl4h9703IzROikK3@uK&&OEb"
  },
  ...
}
你還要記得將 JwtHelpers 類別註冊進 .NET Core 的 DI 容器中(IServiceCollection),也就是 Startup.cs 檔案的 public void ConfigureServices(IServiceCollection services) 方法內:
services.AddSingleton<JwtHelpers>();
以下是 Web API 的設計範例,為了方便示範,我將 TokenController 與相關類別全部寫在一起,原始碼如下:
using System.Linq;
using JwtAuthDemo.Helpers;
using Microsoft.AspNetCore.Authorization;
using Microsoft.AspNetCore.Mvc;

namespace JwtAuthDemo.Controllers
{
    [Authorize]
    [ApiController]
    public class TokenController : ControllerBase
    {
        private readonly JwtHelpers jwt;

        public TokenController(JwtHelpers jwt)
        {
            this.jwt = jwt;
        }

        [AllowAnonymous]
        [HttpPost("~/signin")]
        public ActionResult<string> SignIn(LoginViewModel login)
        {
            if (ValidateUser(login))
            {
                return jwt.GenerateToken(login.Username);
            }
            else
            {
                return BadRequest();
            }
        }

        private bool ValidateUser(LoginViewModel login)
        {
            return true; // TODO
        }

        [HttpGet("~/claims")]
        public IActionResult GetClaims()
        {
            return Ok(User.Claims.Select(p => new { p.Type, p.Value }));
        }

        [HttpGet("~/username")]
        public IActionResult GetUserName()
        {
            return Ok(User.Identity.Name);
        }

        [HttpGet("~/jwtid")]
        public IActionResult GetUniqueId()
        {
            var jti = User.Claims.FirstOrDefault(p => p.Type == "jti");
            return Ok(jti.Value);
        }
    }

    public class LoginViewModel
    {
        public string Username { get; set; }
        public string Password { get; set; }
    }
}
驗證合法有效的 JWT Token
知道如何簽發 Token 之後,接下來就要讓你的 ASP.NET Core 能夠認得使用者傳入的 Bearer Token,這部分只要設定好 Startup.ConfigureServices() 與 Startup.Configure() 即可。
-
public void ConfigureServices(IServiceCollection services)
services
    .AddAuthentication(JwtBearerDefaults.AuthenticationScheme)
    .AddJwtBearer(options =>
    {
        // 當驗證失敗時,回應標頭會包含 WWW-Authenticate 標頭,這裡會顯示失敗的詳細錯誤原因
        options.IncludeErrorDetails = true; // 預設值為 true,有時會特別關閉

        options.TokenValidationParameters = new TokenValidationParameters
        {
            // 透過這項宣告,就可以從 "sub" 取值並設定給 User.Identity.Name
            NameClaimType = "http://schemas.xmlsoap.org/ws/2005/05/identity/claims/nameidentifier",
            // 透過這項宣告,就可以從 "roles" 取值,並可讓 [Authorize] 判斷角色
            RoleClaimType = "http://schemas.microsoft.com/ws/2008/06/identity/claims/role",

            // 一般我們都會驗證 Issuer
            ValidateIssuer = true,
            ValidIssuer = Configuration.GetValue<string>("JwtSettings:Issuer"),

            // 通常不太需要驗證 Audience
            ValidateAudience = false,
            //ValidAudience = "JwtAuthDemo", // 不驗證就不需要填寫

            // 一般我們都會驗證 Token 的有效期間
            ValidateLifetime = true,

            // 如果 Token 中包含 key 才需要驗證,一般都只有簽章而已
            ValidateIssuerSigningKey = false,

            // "1234567890123456" 應該從 IConfiguration 取得
            IssuerSigningKey = new SymmetricSecurityKey(Encoding.UTF8.GetBytes(Configuration.GetValue<string>("JwtSettings:SignKey")))
        };
    });
-
public void Configure(IApplicationBuilder app, IWebHostEnvironment env)
app.UseAuthentication();
請務必設定在 app.UseAuthorization(); 之前!(口訣: 先驗證、再授權)
限制特定 API 只能在通過 JWT 驗證的 HTTP 要求才能存取
這部分就更簡單啦!直接用 ASP.NET Core 內建的 [Authorize] 篩選器即可達成,如下範例:
[Authorize]
[HttpGet("~/claims")]
public IActionResult GetClaims()
{
    return Ok(User.Claims.Select(p => new { p.Type, p.Value }));
}

[Authorize]
[HttpGet("~/username")]
public IActionResult GetUserName()
{
    return Ok(User.Identity.Name);
}
用戶端在取得 JWT Token 之後該如何強制登出
基本上,所有 API 都是無狀態的,因此當用戶端取得 Token 之後,以 JWT 的機制來看,唯一的失效方式就是等到 Token 超過到期時間才行!
但是,在 RFC7519 JSON Web Token (JWT) 規格中,有要求每次發出的 JWT Token 中都必須包含一個 JWT ID (jti) 聲明(Claim),而且每個 JWT Token 都不能重複,必須是唯一值!
因此,你還是可以透過 User.Claims 取得所有 Claims 聲明資訊,因此你可以透過以下程式碼取出當下 JWT Token 的 jti 聲明值:
var jwt_id = User.Claims.FirstOrDefault(p => p.Type == "jti").Value;
接著,你只要將這個唯一碼加入到自訂的黑名單中,再透過一個篩選器(Filters)過濾掉黑名單中的 API 要求即可!
相關連結