我們在專案上因為面對不同的客戶,有時候會遇到各種形形色色的應用程式伺服器要部署,雖然 Spring Boot 已經有內建 Embedded Tomcat 伺服器,但這套主要用在開發時期或微服務部署之用。如果最終你的應用程式要部署到客戶的 Tomcat / JBoss EAP / IBM WebSphere 等正式環境,還是要做出一些調整才行。今天這篇文章就來深入探討部署到 Apache Tomcat® 的設定過程與完整知識。

建立範例應用程式
-
使用 Spring Boot CLI 快速建立專案 (也可以用 Spring Initializr 建立)
spring init --dependencies=web --groupId=com.duotify app1
使用 Visual Studio Code 開啟該專案
code app1
-
加入一個 HomeController 控制器
檔名路徑: src/main/java/com/duotify/app1/controllers/HomeController.java
package com.duotify.app1.controllers;

import org.springframework.web.bind.annotation.GetMapping;
import org.springframework.web.bind.annotation.RestController;

@RestController
public class HomeController {

    @GetMapping("/")
    public String home() {
        return "Hello World";
    }
}
-
測試執行
mvn spring-boot:run
http://localhost:8080/
補充說明: 你可以在 pom.xml 的 <build> 底下新增一個 <defaultGoal>spring-boot:run</defaultGoal> 設定,未來就只要打 mvn 就會自動啟動 Spring Boot 執行喔! 👍
調整專案內容
要部署到獨立的 Tomcat 伺服器,必須做出以下調整,總共只有 3 個步驟而已:
-
調整套用 @SpringBootApplication 的類別 (DemoApplication.java)
原本標註 @SpringBootApplication 的主程式,必須修改成繼承 SpringBootServletInitializer 類別:
package com.duotify.app1;

import org.springframework.boot.SpringApplication;
import org.springframework.boot.autoconfigure.SpringBootApplication;
import org.springframework.boot.web.servlet.support.SpringBootServletInitializer;

@SpringBootApplication
public class DemoApplication extends SpringBootServletInitializer {

  public static void main(String[] args) {
    SpringApplication.run(DemoApplication.class, args);
  }

}
其實 SpringBootServletInitializer 實作了 WebApplicationInitializer 介面,而 WebApplicationInitializer 這個介面是 Servlet 3.0+ (JSR 315) 新增的,實作此介面就會自動設定 ServletContext 並與 Servlet Container 進行通訊,讓應用程式順利掛載到任何支援 Servlet Container 的 Application Server 中。
這個機制是從 Servlet 3.0 API 以上版本才支援的,而 Apache Tomcat 是從 7.0 版以上才開始支援 Servlet 3.0 規格。如果是 Servlet 2.5 以前的版本,還是必須要透過 web.xml 方式註冊 ApplicationContext 及 DispatcherServlet 才行。不過 Apache Tomcat 7.0 是一個已經廢棄的超舊版本,應該不容易遇到才對。詳見 Apache Tomcat® - Which Version Do I Want?
-
調整 pom.xml 並修改 Packaging 格式為 war
<packaging>war</packaging>
-
調整 pom.xml 並加入 spring-boot-starter-tomcat 相依套件,並將 <scope> 設定為 provided
<dependency>
  <groupId>org.springframework.boot</groupId>
  <artifactId>spring-boot-starter-tomcat</artifactId>
  <scope>provided</scope>
</dependency>
以下是目前的 pom.xml 檔案內容:
<?xml version="1.0" encoding="UTF-8"?>
<project xmlns="http://maven.apache.org/POM/4.0.0" xmlns:xsi="http://www.w3.org/2001/XMLSchema-instance"
  xsi:schemaLocation="http://maven.apache.org/POM/4.0.0 https://maven.apache.org/xsd/maven-4.0.0.xsd">
  <modelVersion>4.0.0</modelVersion>
  <parent>
    <groupId>org.springframework.boot</groupId>
    <artifactId>spring-boot-starter-parent</artifactId>
    <version>2.7.3</version>
    <relativePath/> <!-- lookup parent from repository -->
  </parent>
  <groupId>com.duotify</groupId>
  <artifactId>app1</artifactId>
  <version>0.0.1-SNAPSHOT</version>

  <packaging>war</packaging>

  <name>demo</name>
  <description>Demo project for Spring Boot</description>
  <properties>
    <java.version>17</java.version>
  </properties>
  <dependencies>
    <dependency>
      <groupId>org.springframework.boot</groupId>
      <artifactId>spring-boot-starter-web</artifactId>
    </dependency>

    <dependency>
      <groupId>org.springframework.boot</groupId>
      <artifactId>spring-boot-starter-test</artifactId>
      <scope>test</scope>
    </dependency>

    <dependency>
      <groupId>org.springframework.boot</groupId>
      <artifactId>spring-boot-starter-tomcat</artifactId>
      <scope>provided</scope>
    </dependency>

  </dependencies>

  <build>
    <plugins>
      <plugin>
        <groupId>org.springframework.boot</groupId>
        <artifactId>spring-boot-maven-plugin</artifactId>
      </plugin>
    </plugins>
  </build>

</project>
啟動 Tomcat 應用程式伺服器
以下是在本機啟動 Tomcat 應用程式伺服器的步驟:
-
先到 Apache Tomcat 9 Software Downloads 下載 64-bit Windows zip 壓縮檔
apache-tomcat-9.0.65-windows-x64.zip
-
解壓縮到任意資料夾
假設我們解壓縮到 G:\apache-tomcat-9.0.65 資料夾
-
啟動 Tomcat 伺服器
G:\apache-tomcat-9.0.65\bin\catalina.bat run
預設會 LISTEN Port 8080
輸出封裝檔案並部署到 Tomcat 應用程式伺服器
最後我們要輸出一個可以部署到 Tomcat 的 *.war 檔,基本上部署步驟如下:
-
執行 mvn clean package 命令
這個命令會產生 target/app1-0.0.1-SNAPSHOT.war 檔案,大小大約 17MB 左右。
🔽 解壓縮之後的目錄結構可點我展開查看 🔽
.
├─META-INF
│  │  MANIFEST.MF
│  │  war-tracker
│  │
│  └─maven
│      └─com.duotify
│          └─app1
│                  pom.properties
│                  pom.xml
│
├─org
│  └─springframework
│      └─boot
│          └─loader
│              │  ClassPathIndexFile.class
│              │  ExecutableArchiveLauncher.class
│              │  JarLauncher.class
│              │  LaunchedURLClassLoader$DefinePackageCallType.class
│              │  LaunchedURLClassLoader$UseFastConnectionExceptionsEnumeration.class
│              │  LaunchedURLClassLoader.class
│              │  Launcher.class
│              │  MainMethodRunner.class
│              │  PropertiesLauncher$1.class
│              │  PropertiesLauncher$ArchiveEntryFilter.class
│              │  PropertiesLauncher$ClassPathArchives.class
│              │  PropertiesLauncher$PrefixMatchingArchiveFilter.class
│              │  PropertiesLauncher.class
│              │  WarLauncher.class
│              │
│              ├─archive
│              │      Archive$Entry.class
│              │      Archive$EntryFilter.class
│              │      Archive.class
│              │      ExplodedArchive$AbstractIterator.class
│              │      ExplodedArchive$ArchiveIterator.class
│              │      ExplodedArchive$EntryIterator.class
│              │      ExplodedArchive$FileEntry.class
│              │      ExplodedArchive$SimpleJarFileArchive.class
│              │      ExplodedArchive.class
│              │      JarFileArchive$AbstractIterator.class
│              │      JarFileArchive$EntryIterator.class
│              │      JarFileArchive$JarFileEntry.class
│              │      JarFileArchive$NestedArchiveIterator.class
│              │      JarFileArchive.class
│              │
│              ├─data
│              │      RandomAccessData.class
│              │      RandomAccessDataFile$1.class
│              │      RandomAccessDataFile$DataInputStream.class
│              │      RandomAccessDataFile$FileAccess.class
│              │      RandomAccessDataFile.class
│              │
│              ├─jar
│              │      AbstractJarFile$JarFileType.class
│              │      AbstractJarFile.class
│              │      AsciiBytes.class
│              │      Bytes.class
│              │      CentralDirectoryEndRecord$1.class
│              │      CentralDirectoryEndRecord$Zip64End.class
│              │      CentralDirectoryEndRecord$Zip64Locator.class
│              │      CentralDirectoryEndRecord.class
│              │      CentralDirectoryFileHeader.class
│              │      CentralDirectoryParser.class
│              │      CentralDirectoryVisitor.class
│              │      FileHeader.class
│              │      Handler.class
│              │      JarEntry.class
│              │      JarEntryCertification.class
│              │      JarEntryFilter.class
│              │      JarFile$1.class
│              │      JarFile$JarEntryEnumeration.class
│              │      JarFile.class
│              │      JarFileEntries$1.class
│              │      JarFileEntries$EntryIterator.class
│              │      JarFileEntries$Offsets.class
│              │      JarFileEntries$Zip64Offsets.class
│              │      JarFileEntries$ZipOffsets.class
│              │      JarFileEntries.class
│              │      JarFileWrapper.class
│              │      JarURLConnection$1.class
│              │      JarURLConnection$JarEntryName.class
│              │      JarURLConnection.class
│              │      StringSequence.class
│              │      ZipInflaterInputStream.class
│              │
│              ├─jarmode
│              │      JarMode.class
│              │      JarModeLauncher.class
│              │      TestJarMode.class
│              │
│              └─util
│                      SystemPropertyUtils.class
│
└─WEB-INF
    │  classpath.idx
    │  layers.idx
    │
    ├─classes
    │  │  application.properties
    │  │
    │  └─com
    │      └─duotify
    │          └─app1
    │              │  DemoApplication.class
    │              │
    │              └─controllers
    │                      HomeController.class
    │
    ├─lib
    │      jackson-annotations-2.13.3.jar
    │      jackson-core-2.13.3.jar
    │      jackson-databind-2.13.3.jar
    │      jackson-datatype-jdk8-2.13.3.jar
    │      jackson-datatype-jsr310-2.13.3.jar
    │      jackson-module-parameter-names-2.13.3.jar
    │      jakarta.annotation-api-1.3.5.jar
    │      jul-to-slf4j-1.7.36.jar
    │      log4j-api-2.17.2.jar
    │      log4j-to-slf4j-2.17.2.jar
    │      logback-classic-1.2.11.jar
    │      logback-core-1.2.11.jar
    │      slf4j-api-1.7.36.jar
    │      snakeyaml-1.30.jar
    │      spring-aop-5.3.22.jar
    │      spring-beans-5.3.22.jar
    │      spring-boot-2.7.3.jar
    │      spring-boot-autoconfigure-2.7.3.jar
    │      spring-boot-jarmode-layertools-2.7.3.jar
    │      spring-context-5.3.22.jar
    │      spring-core-5.3.22.jar
    │      spring-expression-5.3.22.jar
    │      spring-jcl-5.3.22.jar
    │      spring-web-5.3.22.jar
    │      spring-webmvc-5.3.22.jar
    │
    └─lib-provided
            tomcat-embed-core-9.0.65.jar
            tomcat-embed-el-9.0.65.jar
            tomcat-embed-websocket-9.0.65.jar
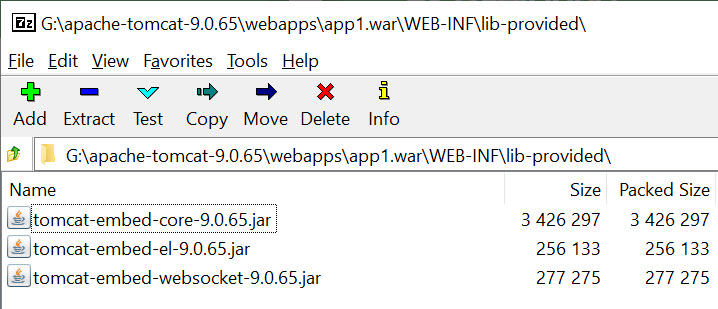
這裡最值得一提的地方,就是 WEB-INF/lib-provided 這個資料夾。由於我們將 pom.xml 的 spring-boot-starter-tomcat 相依套件的 <scope> 調整為 provided 的關係,這個套件從預設加入到 WEB-INF/lib 改搬到 WEB-INF/lib-provided 這個資料夾,這等於我們部署到 Tomcat 應用程式伺服器的時候,預設不會載入 WEB-INF/lib-provided 這個資料夾中的 *.jar 檔。
-
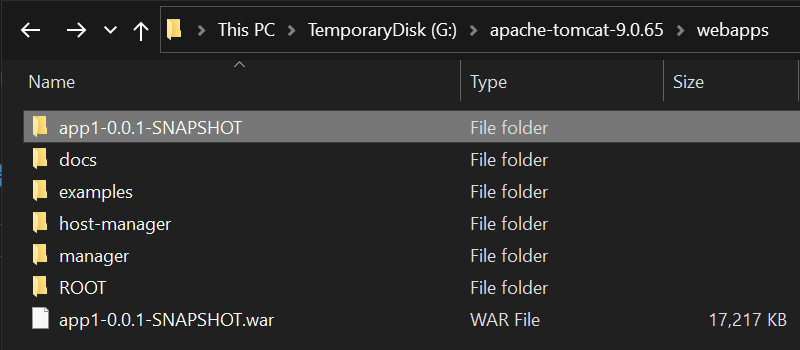
將 target/app1-0.0.1-SNAPSHOT.war 檔案複製到 G:\apache-tomcat-9.0.65\webapps 目錄下
大約等個 1 ~ 3 秒,Tomcat 就會自動部署這個 app1-0.0.1-SNAPSHOT.war 檔案,並自動解壓縮到 app1-0.0.1-SNAPSHOT 目錄下。
而且我們從執行 Tomcat 的 Console 畫面也可以看到以下訊息:
19-Sep-2022 22:43:23.587 INFO [Catalina-utility-2] org.apache.catalina.startup.HostConfig.deployWAR Deploying web application archive [G:\apache-tomcat-9.0.65\webapps\app1-0.0.1-SNAPSHOT.war]
19-Sep-2022 22:43:25.458 INFO [Catalina-utility-2] org.apache.jasper.servlet.TldScanner.scanJars At least one JAR was scanned for TLDs yet contained no TLDs. Enable debug logging for this logger for a complete list of JARs that were scanned but no TLDs were found in them. Skipping unneeded JARs during scanning can improve startup time and JSP compilation time.

  .   ____          _            __ _ _
/\\ / ___'_ __ _ _(_)_ __  __ _ \ \ \ \
( ( )\___ | '_ | '_| | '_ \/ _` | \ \ \ \
\\/  ___)| |_)| | | | | || (_| |  ) ) ) )
  '  |____| .__|_| |_|_| |_\__, | / / / /
=========|_|==============|___/=/_/_/_/
:: Spring Boot ::                (v2.7.3)

2022-09-19 22:43:26.340  INFO 10776 --- [alina-utility-2] com.duotify.app1.DemoApplication         : Starting DemoApplication v0.0.1-SNAPSHOT using Java 17.0.2 on WILLSUPERPC with PID 10776 (G:\apache-tomcat-9.0.65\webapps\app1-0.0.1-SNAPSHOT\WEB-INF\classes started by wakau in G:\apache-tomcat-9.0.65)
2022-09-19 22:43:26.345  INFO 10776 --- [alina-utility-2] com.duotify.app1.DemoApplication         : No active profile set, falling back to 1 default profile: "default"
2022-09-19 22:43:27.284  INFO 10776 --- [alina-utility-2] w.s.c.ServletWebServerApplicationContext : Root WebApplicationContext: initialization completed in 898 ms
2022-09-19 22:43:28.411  INFO 10776 --- [alina-utility-2] com.duotify.app1.DemoApplication         : Started DemoApplication in 2.653 seconds (JVM running for 126.74)
19-Sep-2022 22:43:28.433 INFO [Catalina-utility-2] org.apache.catalina.startup.HostConfig.deployWAR Deployment of web application archive [G:\apache-tomcat-9.0.65\webapps\app1-0.0.1-SNAPSHOT.war] has finished in [4,845] ms
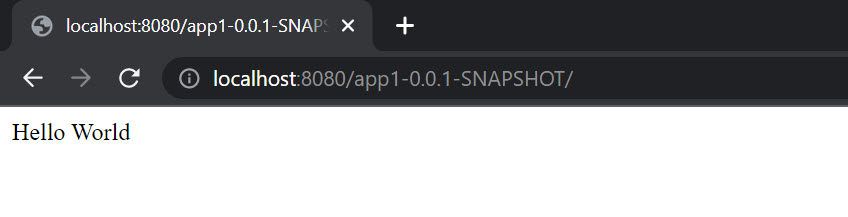
此時你開啟 http://localhost:8080/app1-0.0.1-SNAPSHOT/ 連結,就可以看到網頁成功部署!
-
變更 Tomcat 部署的 Context Path 內容路徑
由於部署 app1-0.0.1-SNAPSHOT.war 到 Tomcat 的時候,預設 WAR 檔的檔名就會自動變成 Tomcat 的 Context Path,所以我們可以調整 pom.xml 的 <build><finalName> 設定,指定最終輸出的檔名即可。我們可以用 ${project.artifactId} 這個 Maven 內建屬性,直接取得本專案的 artifactId 當成檔名:
<build>
  <finalName>${project.artifactId}</finalName>
  ...
</build>
此時再執行一次 mvn clean package 就會輸出 target/app1.war 檔案了!👍
補充說明: 若要在開發測試階段也指定 Context Path 的話,可以到 src/main/resources/application.properties 加入一個 server.servlet.context-path=/app1 屬性設定即可。詳見: Spring Boot Change Context Path
關於 Maven 相依管裡的 provided scope 的技術細節
我們這個 Spring Boot 應用程式在封裝時,我還有發現一個魔鬼般的細節。
我原本以為只要相依套件設定為 <scope>provided</scope> 的話,就只有在 compile 與 test 的時候會用到,實際上在 runtime 的時候就不會載入。那如果不會載入,理論上是不是應該從最終封裝的 *.war 檔中排除,這樣可以讓 *.war 的整體檔案大小降低,更快速的部署才對。
結果我研究後發現,實則不然,整體 *.war 檔的大小完全不會降低,所有 Tomcat Embedded 相關檔案還是被包進去了:
而且我還發現,這個 app1.war 檔案,不單單可以部署到 Tomcat 應用程式伺服器,他依然可以透過 java -jar app1.war 獨立執行。其實想想這樣的設計還是挺方便的,可以隨時在本機執行,同時又可以進行遠端部署,唯一的缺點就是檔案比較大而已。
我花了許多時間嘗試了許多作法,想透過 Maven 建置的過程自動排除掉 Tomcat Embedded 相關檔案,後來有研究出可以跳過 spring-boot-maven-plugin plugin 執行 repackage 目標的方法。你只要調整一下 spring-boot-maven-plugin plugin 設定即可:
<plugin>
  <groupId>org.springframework.boot</groupId>
  <artifactId>spring-boot-maven-plugin</artifactId>
  <executions>
    <execution>
      <id>repackage</id>
      <goals>
        <goal>repackage</goal>
      </goals>
      <configuration>
        <skip>true</skip>
      </configuration>
    </execution>
  </executions>
</plugin>
如果要透過 Spring Profiles 自動切換設定,完整設定如下:
<?xml version="1.0" encoding="UTF-8"?>
<project xmlns="http://maven.apache.org/POM/4.0.0" xmlns:xsi="http://www.w3.org/2001/XMLSchema-instance" xsi:schemaLocation="http://maven.apache.org/POM/4.0.0 https://maven.apache.org/xsd/maven-4.0.0.xsd">
  <modelVersion>4.0.0</modelVersion>
  <parent>
    <groupId>org.springframework.boot</groupId>
    <artifactId>spring-boot-starter-parent</artifactId>
    <version>2.7.3</version>
    <relativePath /> <!-- lookup parent from repository -->
  </parent>
  <groupId>com.duotify</groupId>
  <artifactId>app1</artifactId>
  <version>0.0.1-SNAPSHOT</version>

  <packaging>war</packaging>

  <name>demo</name>
  <description>Demo project for Spring Boot</description>
  <properties>
    <java.version>17</java.version>
  </properties>
  <dependencies>
    <dependency>
      <groupId>org.springframework.boot</groupId>
      <artifactId>spring-boot-starter-web</artifactId>
    </dependency>

    <dependency>
      <groupId>org.springframework.boot</groupId>
      <artifactId>spring-boot-starter-test</artifactId>
      <scope>test</scope>
    </dependency>

    <dependency>
      <groupId>org.springframework.boot</groupId>
      <artifactId>spring-boot-starter-tomcat</artifactId>
      <scope>provided</scope>
    </dependency>

  </dependencies>

  <build>
    <finalName>${project.artifactId}</finalName>
    <plugins>
      <plugin>
        <groupId>org.springframework.boot</groupId>
        <artifactId>spring-boot-maven-plugin</artifactId>
        <executions>
          <execution>
            <id>repackage</id>
            <goals>
              <goal>repackage</goal>
            </goals>
            <configuration>
              <skip>${skip.repackage}</skip>
            </configuration>
          </execution>
        </executions>
      </plugin>
    </plugins>
  </build>
  <profiles>
    <profile>
      <id>default</id>
      <activation>
        <activeByDefault>true</activeByDefault>
      </activation>
      <properties>
        <skip.repackage>false</skip.repackage>
      </properties>
    </profile>
    <profile>
      <id>prod</id>
      <properties>
        <skip.repackage>true</skip.repackage>
      </properties>
    </profile>
  </profiles>
</project>
今後你就可以依據不同的 Profile 執行不同的命令,產生不同的 WAR 檔:
-
發行測試環境的 WAR 檔,可以執行:
mvn clean package
輸出的 app1.war 大約 17MB 左右
-
發行生產環境的 WAR 檔,可以執行:
mvn clean package -Pprod
輸出的 app1.war 大約 12MB 左右
相關連結