昨天介紹了 SDKMAN 這套工具,文章中有安裝 Spring Boot CLI 這套命令列工具,雖然在有 IDE 的情形下已經用不太到這個 CLI 工具,不過我還是大致看了一下,結果發現用 Groovy 開發 Spring Boot 還蠻棒的!👍
簡介 Spring Boot CLI
Spring Boot CLI 是一個命令列工具 (CLI Tool),如果你想快速開發 Spring 應用程時的時候,是可以用這套工具輔助你快速完成一個應用程式開發。你只要先撰寫一份 Groovy 腳本(scripts),就可以立即透過 Spring Boot CLI 執行出一個 Spring Boot 應用程式,完全不用任何前置作業。
當然,你也可以使用 Spring Boot CLI 來快速建立一個基於 Maven 或 Gradle 的 Spring Boot 專案 (透過 Spring Initializr 服務)。
Spring Boot CLI 基本使用方式
在你透過 SDKMAN 執行 sdk install springboot 命令安裝成功後,直接執行 spring 或 spring help 命令,就可以得到基本使用方式說明。
usage: spring [--help] [--version]
      <command> [<args>]

Available commands are:

  run [options] <files> [--] [args]
    Run a spring groovy script

  grab
    Download a spring groovy script's dependencies to ./repository

  jar [options] <jar-name> <files>
    Create a self-contained executable jar file from a Spring Groovy script

  war [options] <war-name> <files>
    Create a self-contained executable war file from a Spring Groovy script

  install [options] <coordinates>
    Install dependencies to the lib/ext directory

  uninstall [options] <coordinates>
    Uninstall dependencies from the lib/ext directory

  init [options] [location]
    Initialize a new project using Spring Initializr (start.spring.io)

  encodepassword [options] <password to encode>
    Encode a password for use with Spring Security

  shell
    Start a nested shell

Common options:

  --debug Verbose mode
    Print additional status information for the command you are running


See 'spring help <command>' for more information on a specific command.
從說明中可以發現,裡面有許多子命令都是透過 groovy script 來執行的,因此你可以將其視為 Groovy Script 的啟動器,只是他主要用來跑 Spring Boot 應用程式而已。
-
查看初始化 Spring Boot 命令的可用選項
spring init --list
這裡將會顯示所有 spring init 可用餐數的清單與預設值:
Parameters
+-------------+------------------------------------------+------------------------------+
| Id          | Description                              | Default value                |
+-------------+------------------------------------------+------------------------------+
| artifactId  | project coordinates (infer archive name) | demo                         |
| bootVersion | spring boot version                      | 2.7.3                        |
| description | project description                      | Demo project for Spring Boot |
| groupId     | project coordinates                      | com.example                  |
| javaVersion | language level                           | 17                           |
| language    | programming language                     | java                         |
| name        | project name (infer application name)    | demo                         |
| packageName | root package                             | com.example.demo             |
| packaging   | project packaging                        | jar                          |
| type        | project type                             | maven-project                |
| version     | project version                          | 0.0.1-SNAPSHOT               |
+-------------+------------------------------------------+------------------------------+
-
建立 Spring Boot 應用程式專案目錄
spring init --dependencies=web,lombok my-project
此命令執行時訊息如下,他其實還是透過 https://start.spring.io 網站來產生一個專案範本,並且上述命令會自動產生一個 my-project 資料夾:
Using service at https://start.spring.io
Project extracted to '/home/will/projects/my-project'
-
建立 Spring Boot 應用程式專案壓縮檔
如果想產生一個專案範本的壓縮檔 (my-project.zip),可以這樣執行:
spring init --dependencies=web,lombok my-project.zip
預設執行 spring init 命令 (不加上任何參數),會預設產生一個 demo.zip 檔案。
-
建立 Spring Boot 應用程式專案目錄,並使用 Gradle Build Tool
如果想產生一個使用 Gradle、指定 Java 1.8 版本、並以 war 封裝的 Spring Boot 專案,可以這樣執行:
spring init --build=gradle --java-version=1.8 --dependencies=web,lombok --packaging=war my-project2
體驗 Spring Boot CLI 建立專案
Spring Boot CLI 建立出來的 Spring Boot 專案,都已經套用了
-
建立 Spring Boot 應用程式專案目錄 (demo1)
spring init --dependencies=web,lombok --groupId=com.duotify demo1
這個 demo1 資料夾將會呈現以下目錄結構:
$ tree
.
├── HELP.md
├── mvnw
├── mvnw.cmd
├── pom.xml
└── src
    ├── main
    │   ├── java
    │   │   └── com
    │   │       └── duotify
    │   │           └── demo2
    │   │               └── DemoApplication.java
    │   └── resources
    │       ├── application.properties
    │       ├── static
    │       └── templates
    └── test
        └── java
            └── com
                └── duotify
                    └── demo2
                        └── DemoApplicationTests.java

14 directories, 7 files
-
使用 Visual Studio Code 開啟 demo1 資料夾
code demo1
若是第一次開啟 VS Code 請安裝 Essential Java Spring Boot Snippets 擴充套件。
-
加入預設首頁
先找到應用程式入口點,也就是有標示 @SpringBootApplication 的類別
src/main/java/com/duotify/demo1/DemoApplication.java
原始碼長這樣:
package com.duotify.demo1;

import org.springframework.boot.SpringApplication;
import org.springframework.boot.autoconfigure.SpringBootApplication;

@SpringBootApplication
public class DemoApplication {

  public static void main(String[] args) {
    SpringApplication.run(DemoApplication.class, args);
  }

}
這裡的 @SpringBootApplication 是一個集合標注,他也同時意味著標注了 @Configuration、@EnableAutoConfiguration 與 @ComponentScan 這三個 Annotation,因此 DemoApplication 本身就是個自動設定檔。
只要在 DemoApplication 類別再標示個 @RestController 並加入一個 home() 方法,標示 @GetMapping("/") 就有了預設首頁! 👍
package com.duotify.demo1;

import org.springframework.boot.SpringApplication;
import org.springframework.boot.autoconfigure.SpringBootApplication;
import org.springframework.web.bind.annotation.GetMapping;
import org.springframework.web.bind.annotation.RestController;

@SpringBootApplication
@RestController
public class DemoApplication {

  @GetMapping("/")
  public String home() {
    return "Hello World";
  }

  public static void main(String[] args) {
    SpringApplication.run(DemoApplication.class, args);
  }

}
體驗 Spring Boot CLI 執行 Groovy script
-
建立一個 hello.groovy 腳本
以下命令跑在 Bash 環境下:
cat <<EOF > hello.groovy
@RestController
class WebApplication {

    @RequestMapping("/")
    String home() {
        "Hello World!"
    }

}
EOF
-
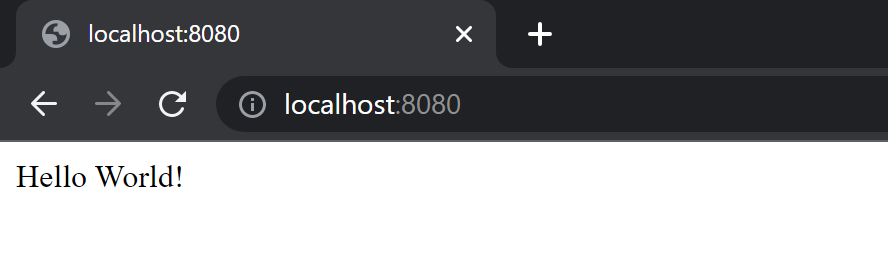
直接執行 hello.groovy 腳本
spring run hello.groovy
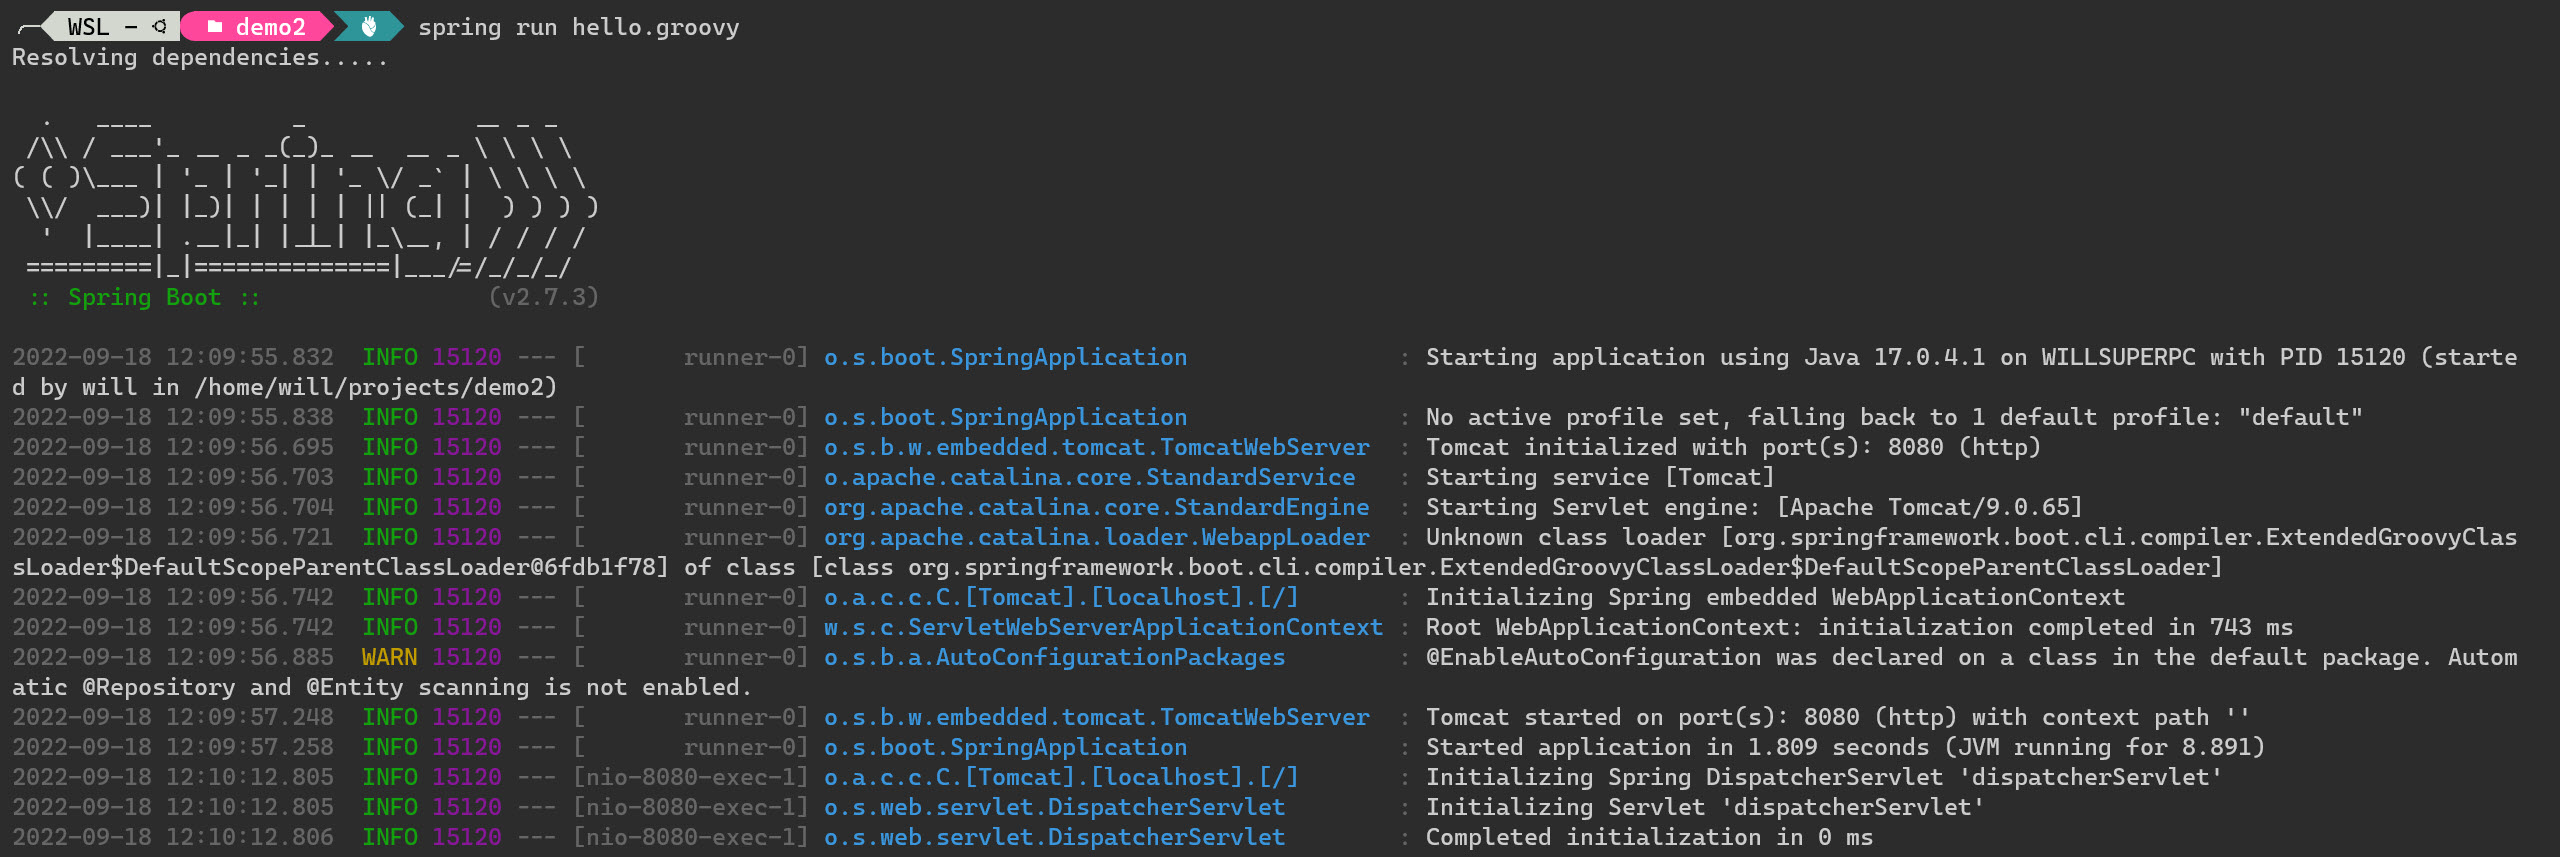
透過瀏覽器開啟 http://localhost:8080/ 即可看到網站!
事實上,你還可以對這個應用程式做出微調,例如你不想將應用程式跑在 Port 8080,改用 Port 9000 的命令如下:
spring run hello.groovy -- --server.port=9000
記得中間要用 -- 隔開參數。
如果你想傳入額外的 JVM 參數,可以透過 JAVA_OPTS 環境變數來傳入,例如:
JAVA_OPTS=-Xmx1024m spring run hello.groovy
注意: 這裡的 JAVA_OPTS=-Xmx1024m 環境變數設定只會套用在這一次的命令列執行而已。
仔細想想,這也太酷了吧,整個 Spring Boot 網站,就只要一個檔案就可以跑起來了耶!👍
如果你有超過不止一個 API 要執行,你可以撰寫多個 *.groovy 檔案,例如:
-
建立一個 test.groovy 腳本
以下命令跑在 Bash 環境下:
cat <<EOF > test.groovy
@RestController
class TestController {

    @RequestMapping("/test")
    String home() {
        "Test!"
    }

}
EOF
-
直接透過 shell globbing 語法 (*.groovy) 執行所有腳本
spring run *.groovy
透過瀏覽器開啟 http://localhost:8080/ 與 http://localhost:8080/test 都可看到網站!
帥呀老皮!有夠乾淨的專案架構!😍
那我們如果要封裝應用程式為 JAR 檔可以嗎?可以的!
-
將 *.groovy 封裝成 demo2.jar 檔
spring jar demo2.jar *.groovy

這裡的 demo2.jar.original 是你的原始應用程式內容,而 demo2.jar 則是包含 Tomcat 的內容,所以檔案大很多。
請注意: 使用 spring jar 封裝的時候,預設會包含 public/**, resources/**, static/**, templates/**, META-INF/**, * 這些檔案與路徑,且預設會排除 .*, repository/**, build/**, target/**, **/*.jar, **/*.groovy 這些檔案與路徑。你也可以透過 --include 或 --exclude 自行加入或排除更多檔案到 JAR 檔中。
-
執行 JAR 檔
java -jar demo2.jar
Groovy 是如何使用第三方套件的?
雖然 Groovy 是一個基於 Java 的動態腳本語言,背後其實還是跑在 JVM 底下,那 Java 原本需要的那些 Code 怎麼可能憑空消失呢?說好的 import 呢?說好的 classPath 呢?還有 Spring Boot 需要的那些相依套件 (例如 spring-boot-starter-web, spring-boot-starter-data-jpa, ... 之類的) 又到哪裡去了?
在標準的 Groovy 語言中有個 @Grab 標注(annotation),可以讓你宣告第三方函式庫的相依性,因此可以讓 Groovy 像 Maven 或 Gradle 那樣自動下載 JARs 檔,但卻不需要任何建置工具。
而 Spring Boot 則是利用了這個技術,直接依據你所寫的程式碼自動抓取(Grab)你需要的函式庫或套件。例如我們剛剛的 hello.groovy 腳本,在 WebApplication 類別上用到了 @RestController 標注,因此會自動抓取 Tomcat 與 Spring MVC 套件回來,是不是真的很酷!😍
cat <<EOF > hello.groovy
@RestController
class WebApplication {

    @RequestMapping("/")
    String home() {
        "Hello World!"
    }

}
EOF
官網的 Spring Boot CLI 文件有列出一些對應表,讓你知道寫了哪些程式,就會自動下載哪些套件:
| Items |
Grabs |
| JdbcTemplate, NamedParameterJdbcTemplate, DataSource |
JDBC Application. |
| @EnableJms |
JMS Application. |
| @EnableCaching |
Caching abstraction. |
| @Test |
JUnit. |
| @EnableRabbit |
RabbitMQ. |
| extends Specification |
Spock test. |
| @EnableBatchProcessing |
Spring Batch. |
| @MessageEndpoint @EnableIntegration |
Spring Integration. |
| @Controller @RestController @EnableWebMvc |
Spring MVC + Embedded Tomcat. |
| @EnableWebSecurity |
Spring Security. |
| @EnableTransactionManagement |
Spring Transaction Management. |
你只要去 Spring Boot CLI 的原始碼專案找出所有 CompilerAutoConfiguration 的子類別,就可以知道怎麼運作的了。
除了這些內建會自動抓取的相依套件外,你在 Spring Boot 可以透過 @Grab('freemarker') 語法,宣告需要使用到哪些套件,無須指定 group 或 version 等資訊,完整的短名清單可以參閱 Dependency Coordinates 文件。
你可以透過 spring grab *.groovy 命令,自動將所有程式碼中用到的相依套件全部下載到 ./repository 目錄下。
在用 Groovy 撰寫 Spring Boot 的時候,大多數情況都是不用特別撰寫 import 語法的,例如 @Component, @RestController 與 @RequestMapping 之類的標注通通不需要特別明確匯入,因此程式碼十分乾淨清爽!👍
最後,使用 Groovy 撰寫 Spring Boot 時,可以不用特別寫啟動類別與 public static void main(String[] args) 方法,連 SpringApplication 實體都不用建立,Spring Boot CLI 會自動幫你與原始碼一起建立,是不是很棒!👍
總結
我之前沒想過要用 Apache Groovy 來寫 Spring Boot 應用程式,而且我也很少聽到有人這麼做,但研究過 Spring Boot CLI 之後,我覺得用 Groovy 也蠻好的耶,整個目錄架構與程式碼都非常簡潔,而且底層一樣是走 JVM 架構,與現有的任何 Java 相依套件都相容,也沒有什麼效能問題,自動化部署與封裝也都很正常。
但 Apache Groovy 畢竟是一個新的程式語言,有他自己的語言特性,語法也跟 Java 有些許差異,雖然學習門檻沒有很高,但不一樣就是不一樣,要推廣應該不太容易吧。
相關連結